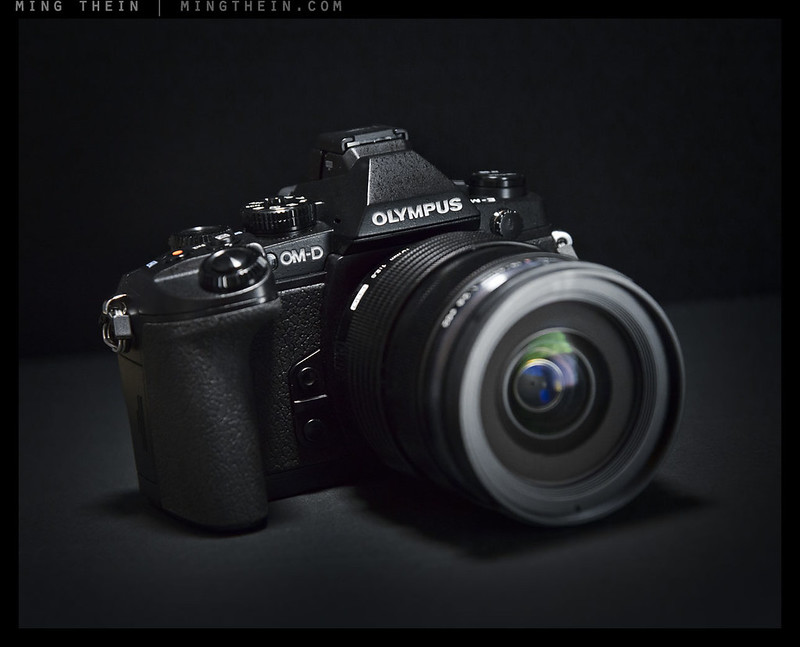
Quantcast
Channel: Gearhead: Reviews – Ming Thein | Photographer
Viewing all 188 articles
Browse latest View live

FD Shooting with the legends: The Hasselblad 501CM

$
0
0

_8035994 copy

There are two cameras that are synonymous with 6×6 medium format film: the Rolleiflex TLR, and the Hasselblad V series. (I may well do a piece on the former in the future). Today’s subject, however, is one of the final incarnations of the V line – the 501CM. I suppose you could think of it as the distilled essence of the V series – unlike the 503s, it lacks TTL flash metering; unlike the 200-series, it still relies on a lens-based leaf shutter and remains completely mechanical. But at the same time, the camera has interchangeable focusing screens and the gliding mirror geometry of the 503CW to prevent vignetting with longer lenses. (I have a brief intro to the Hasselblad V series here.) It’s my pick of the bunch because a) I have no intention of using it with TTL flash, and b) I’d rather not have to rely on electronics in any way – there are modern digitals for that…

_8035992 copy

Continuing the car analogy, I suppose one could think of the V series as being like the Porsche 911 – frequently changed in small but meaningful ways, but always instantly identifiable as being of the same lineage; the 501CM is therefore the stripped-down lightweight version with everything you need and nothing more – a 911GT3 with manual transmission and rollcage; or perhaps that’s the black version. It’s a serious camera for serious photography: you know this from the moment you pick it up because it feels solid and all-of-a-piece. Don’t let the chrome fool you into thinking otherwise. Both black and chrome versions are seriously beautiful cameras; I have a 501C and 501CM; the former is black with grey griptac, and the latter is original chrome/black – there’s an elegance about the chrome/black that reminds me of the trim details of classic Continental cars from the late 60′s.

_8035996 copy

I’m going to be very forthright here: these are not intuitive cameras to shoot at all. The first time you pick one up, it’ll probably confuse you: challenge number one is merely figuring out how to hold it. The manual states that you’re supposed to use your left hand to cradle body and lens, with your left index finger on the shutter release. The right hand operates the lens rings and winding crank. I find that this position is counterintuitive to an SLR user because the right hand normally holds/ winds/ shoots, and the left hand operates the lens; for the V series, if you’re not careful when using your left hand, your thumb can also accidentally depress the lens release – something that should definitely not be followed by turning the lens, because it will dismount! I prefer to cradle body and lens in my left hand, using my left hand for adjustments and my right hand to shoot and wind; the only problem here is that the ridges on aperture and shutter rings are positioned for use with the right hand, and can require a bit of fumbling to find the first time.

_8_8031283 copy

It’s worth taking a moment to mention loading, too: you can load backs independently of cameras (there’s a dark slide you have to remember to remove before shooting – the camera will not shoot with it in place, nor can you remove the back without inserting it first); you can interchange backs mid-roll; and you can even add digital backs – to any V-series Hasselblad that can take an A-magazine. Film must be loaded in the right direction and snaked through the rollers, then under the pressure plate tab (close the back opening key), onto the opposite spool, caught, then wound til ‘START’ shows on the roll. You’ve got to wind some films a bit further along or risk losing part of the first frame; Acros with its narrow spools and late start point is a bit notorious for this. Then you open the opening key, load the back, close the key, and wind until the frame count hits ’1′. Let’s just say you won’t be doing this in a hurry, though it can be done in under a minute with some practice.

_2_8031019 copy

That’s just handling: we now come to the left-right inversion of the waist level finder (with folding hood), and the fact that the cameras have no meter unless you buy one of the meter prisms (which also fixes the inversion problem, but unfortunately also looks very, very ugly; it spoils the lines of the camera – especially the chrome ones, because the finders are black plastic). Assuming you can get used to that, and the pop-up magnifier required for critical focusing, then you’ll probably get over the hump and start to find the camera becomes very transparent in use. Since there are only three controls (aperture/ shutter/ focus) and two of them coupled via a button on later lenses in a sort of program mode (aperture/ shutter), there isn’t much to set; the viewfinder is truly enormous and bright, making composition and focusing a breeze – especially with one of the prism finders – and simply puts everything else I’ve used to shame. A full frame DSLR will look like a dark cave in comparison, and a consumer APS-C DSLR like trying to peer through a drinking straw. It’s very, very difficult to go back.

_8028840 copy

Figure out a grip that’s natural to you; train your eye to work as a meter (or pick up one of those little handy Voigtlander VC-Meter IIs) and suddenly you’re in a rhythm: compose, focus, hit the shutter, ‘whump’, wind; repeat. The solid, low-pitched ‘thump!’ of the mirror and secondary curtains is oddly reassuing in an addictive sort of way. There’s less vibration than you might think; partially because of good damping, partially because you’re not pushing down on the shutter but backwards, and partially because you can ease it quite smoothly. There’s also mirror lockup; use this and you hear no more than the very quiet ‘tic!’ of the leaf shutter. Of course you can’t frame precisely, since it is an SLR after all…

_8028616 copy

I think one of the high points of the camera has to be the lenses: with the exception of one Schneider zoom, all of the V mount lenses are Carl Zeiss optics, made in Germany, with T* coatings. They render in a very three-dimensional way with wonderful microcontrast and saturation; there’s a tonal richness present on film or digital that shows these lenses were the best in the day – and can still very much play at the top of the game now; hence the proliferation of adaptors (V to H, V to Leica S) even on newer cameras. Interestingly, the lenses also hold up very well on even high density digital sensors – I’ve tested most of mine on my D800E with an adaptor and was very surprised by the results, which were actually very consistent with the modern ZF.2 series in both resolution and overall rendering style.

_5_8031127 copy

Given the frequency with which I post images shot with my 501/501CM, you’ve all probably figured out by now that I’m extremely fond of these cameras; I find them creatively challenging, and the results hugely rewarding; in fact, almost all of my personal photography is done with a V series these days. They make me stop and think when I shoot – as a result, my keeper rate is astronomically high compared to digital – about 80-90% vs 2-3% – and of course black and white film delivers tonality that’s unmatched by digital, of course providing it’s properly developed. I will be honest: they aren’t for everybody; however, it’s very, very easy to get hooked on the enormous negatives that come out of it…MT

The best place to find vintage gear is on the secondary market in Japan – send an email to Bellamy Hunt of Japan Camera Hunter; he can source to spec and budget. I get a good chunk of my stuff from him and can’t recommend him highly enough. Send him an email and tell him Ming sent you!

____________

Visit our Teaching Store to up your photographic game – including Photoshop Workflow DVDs and customized Email School of Photography; or go mobile with the Photography Compendium for iPad. You can also get your gear from B&H and Amazon. Prices are the same as normal, however a small portion of your purchase value is referred back to me. Thanks!

Don’t forget to like us on Facebook and join the reader Flickr group!

appstorebadge

Images and content copyright Ming Thein | mingthein.com 2012 onwards. All rights reserved


Filed under: Film Diaries, Gearhead: Reviews

FD Shooting with the legends: The Hasselblad 903 SWC

$
0
0

A4517979 copy

All of Hasselblad’s SWC (originally ‘Supreme Wide Angle, then Super Wide Angle, then abbreviated from ‘Super Wide Camera’) cameras are slightly odd beasts: they’re tiny for medium format, but large for anything else; they look very much like stunted miniature versions of the regular V series bodies. It’s as though somebody chopped the middle section out, taking the winding crank and waist-level finder out along with it. In place, the camera has grown a large megaphone-like viewfinder, and the shutter release has migrated to the top of the body.

A4517997 copy

The SWC is all about the lens – a 4.5/38 Zeiss Biogon, symmetric, and supposedly of great optical perfection; there were only two changes throughout the entire long life of the optic – one to add T* coating, and the other in the 90s to change an element or two from lead-arsenic glass to something a bit less toxic. It’s roughly equivalent to a 21mm diagonal on 35mm. In my mind, the camera to have is the 903: the earlier cameras have a finder that has a side prism to reflect a bubble level on top of the camera body into the finder; it catches dust easily and quickly starts to annoy. Cameras before the SWC/M had a short tripod foot and viewfinder foot that a) didn’t allow for certain backs, notably digital; and b) caused parts of the finder to be occluded by the lens. There was then a transition period where the shutter unit changed, and due to tight tolerances inside the lens, some late SWC/Ms had issues where one internal element was scratched by one of the shutter blades; this was fixed with the 903. Somewhere between SWC/M and 903, a new finder was introduced that integrated the bubble level into the top. I believe the later 903 and all 905 finders added markings for a 645 crop, which helps when using a digital back.

_8036402 copy
Verticality. Some of you may recognize this one…

If you thought handling of the V series took some getting used to, the SWCs are even worse – due to their odd shape and eye-level finder, it’s not exactly simple to figure out how one should hold them; I use my index finger on the shutter release, but find it rather uncomfortable because it’s both quite stiff and has a hard ridge that becomes painful after a while; a soft release is a must. Oddly, despite having no mirror to recoil and only a leaf shutter in the lens, the break point for the shutter is quite hard, and the shutter ‘snaps’ – it’s higher in pitch and louder than the V series lenses, and still draws attention. The act of releasing the shutter isn’t low-vibration, either – it’s difficult to be smooth and apply a lot of force to something that suddenly trips and has no resistance.

_8036392 copy

Operation of the rest of the camera – focus/aperture/shutter rings, back loading etc – are the same as the regular V series (and it also takes all of the same backs the V series takes) – I covered this in the previous instalment in the series here. There’s one important catch, though: this is a scale focus-ONLY camera. Since there’s no TTL viewing or rangefinder, you have to guess (or measure) the distance from the film plane to your subject, and set it on the lens.

_8036364 copy

This brings me to the viewfinder: I love it and hate it in equal parts. The design itself is very clever. Firstly, there’s a bubble level built into the top and an internal mirror so you can always see whether you’re level or not (providing you’re holding the camera horizontally, of course); next we have a small convex element in the front portion of the finder glass that allows you to see all of the exposure and focus settings on the lens without having to take your eye away from the finder – even the regular V series doesn’t offer this! There’s also a very secure locking foot that prevents the finder from coming off, and needless to say, like the rest of the camera, it’s very well made. However, that’s where the good news ends: the finder is almost completely useless for composing with. Not only is there a huge amount of (understandable) distortion, but it’s almost impossible to determine exactly what you’re framing for – the line markings show far less than the film captures, but the outside shows too much; and of course neither are anywhere near accurate when you put a 1.1x 645 digital back on the camera. There has to be a better finder solution…either that, or you really need to start seeing the world in 21mm squares.

_8036378 copy

It’s worth noting that although the SWCs are capable of accepting the CFV digital backs, it’s not recommended by Hasselblad. The reason for this is a strong cyan-magenta shift across the image caused by the symmetric design of the lens; it’s a similar effect to what one sees in an uncorrected wide lens used on a digital M Leica. In practice, it’s correctable in postprocessing, but not at all easy. Furthermore, you also need to use an L-bracket to hold the battery so it clears the tripod foot; I suppose one could either remove it entirely or saw the back portion off, but this is not recommended for resale value!

_8036389 copy

On film, I found that the quality of the results very much lived up to the hype: this is one seriously impressive lens in every way – sharpness, microcontrast, resolution, color rendition and saturation – none can be bettered. However, on digital (now somewhere between 25 and 28mm equivalent), it loses quite a bit of its shine: between the color casts, impossibility of framing, sensitivity to camera shake (1/30s handheld was fine on film, 1/60s frequently showed motion blur on digital) and edge softness, you’re better off with then 40/4 CF FLE on a regular V body instead.

_8036377 copy

I felt that this was very much a love-it-or-hate-it camera; this has more to do with the deployment of the camera than anything else. For me, the main part of the problem was being unable to compose accurately; the best I could do was take a shot, review it on the CFV’s (very poor) LCD, and then rinse and repeat; this obviously doesn’t work for temporally-sensitive subjects like street photography and was a bigger annoyance than the color casts. Compounding this was the difficulty in focusing it accurately – the margin for focus error on a digital sensor is essentially zero, since the focal plane is really a plane – unlike film, whose emulsion has some thickness to it and is therefore a bit more forgiving of errors.

_8036380 copy

When shot on film, it was consistently wider than expected and suggested by the viewfinder, leaving me with a lot of extra empty space; I suppose the trick is to frame critical elements inside the marked square, then expect a bit of overrun. Try as I might, I could never help shake the feeling that my photography with this camera was a bit like playing the lottery: you’d either get something unusable, or something extremely unusual and special, but completely unexpected. That said, it’s worth concluding with the most important fact: it was a lot of fun to shoot with. MT

The best place to find vintage gear is on the secondary market in Japan – send an email to Bellamy Hunt of Japan Camera Hunter; he can source to spec and budget. I get a good chunk of my stuff from him and can’t recommend him highly enough. Send him an email and tell him Ming sent you!

____________

Visit our Teaching Store to up your photographic game – including Photoshop Workflow DVDs and customized Email School of Photography; or go mobile with the Photography Compendium for iPad. You can also get your gear from B&H and Amazon. Prices are the same as normal, however a small portion of your purchase value is referred back to me. Thanks!

Don’t forget to like us on Facebook and join the reader Flickr group!

appstorebadge

Images and content copyright Ming Thein | mingthein.com 2012 onwards. All rights reserved


Filed under: Film Diaries, Gearhead: Reviews

FD Shooting with the legends: The Olympus [mju:]-II

$
0
0

_8038462 copy

I suppose it’s possible to call this camera the epitome of film point and shoots; it was, after all, quite possibly the Volkswagen Beetle of its generation. Made in huge numbers (3.8 million for this model alone, 10 million of all Mju variants), not especially expensive, but by all accounts incredibly reliable and delivering consistently excellent results. I certainly remember lusting after one while growing up, but through some strange turn of events landed up buying a rather useless Fuji 1010ix APS camera instead, which I still regret to this day. Thanks to some blind luck and the quick actions of a friend, I managed to eventually get my hands on one – new in box, for not much more than a brick of film.

_8036346 copy

This camera’s single claim to fame is its outstanding lens: a 35/2.8 equivalent, with four elements in four groups and focusing down to 35cm, with autofocus of course. It has active, multi-beam AF with focus lock (supposedly) and DX coding; there’s also a built in flash and self timer. It’s waterproof/ splash proof. And…that’s about it, really. So far as I’ve been able to tell, you can’t even lock focus by half pressing and recomposing; you have to just compose, shoot, and hope the multi-point AF picks up whatever’s closest (and that whatever’s closest is what you intended to shoot in the first place).

_8036327 copy

Design-wise, it’s a smooth, plasticky-feeling pebble with a flush sliding cover to both protect the lens and all other optical windows as well as cycle power. It fits in your hand quite well, and is remarkably compact, measuring just 105x59x35mm – take that, Sony RX1. It’s positively tiny; opening it up reveals that it really isn’t much larger than is required to cram a roll of film, the frame width and a takeup spool in there. Like all film compacts, there’s an optical finder; it’s actually quite useless too, as it shows a very small amount of the actual frame, which has a single central mark for AF, two small parallax correction marks for near focus, and a couple of LEDs for focus lock and flash ready.

_8036319 copy

Apparently, the focus locks with a half-press once the green LED is displayed, though I’ve never been able to make it work on my camera – the focusing noises only seem to happen on the full press. There’s also a spot metering mode which is rather cryptically explained in the manual – it appears to only lock exposure on the full press, which doesn’t really make sense (surely you’d want your subject to be in focus and properly exposed?). This is the only way to control exposure with this camera; there are no exposure compensation buttons/ toggles/ dials/ switches etc. In fact, the whole thing really only has four buttons including the shutter and rewind override.

_8036339 copy

Aside from that, there’s only one other thing you need to know about this camera: the flash automatically charges with the camera being powered on, so you must remember to turn it off every time you open the slider unless you want it to go off. This gets very annoying very quickly, and is the bane of a stealthy street photographer – forget it once, and you’re instantly Bruce Gilden whether you want to be or not.

The camera’s biggest redemption has to be its lens. It’s bright, contrasty, and incredibly sharp; we never really know what aperture the camera has picked or what it’s focused on, but so long as what you wanted to shoot was in focus, the lens really delivers the goods – I can only imagine how good this would be repackaged and remounted as perhaps an M-mount lens, or with an APS-C sensor behind it. (Olympus, are you listening?) Despite having only a three-bladed diaphragm, it actually delivers surprisingly smooth bokeh providing there aren’t any point highlights in the frame.

_8036343 copy

Many photographers have called this the ultimate point and shoot – I disagree for several reasons, mainly owing to the fact that the output has very little to do with the photographer (other than composition, which is affected by exposure anyway) and more to do with the camera. It’s democratizing, to say the least. Personally, I preferred the Ricoh GR1v – its controls just made much more sense, and actually offered quite a handy degree of, well, control. It’s a camera that certainly requires very little thinking to use, and delivers consistent results – mostly in the good category rather than excellent since you have absolutely no idea where it’s focused or what it’s metered. Truth be told, I didn’t like it at all; there were many aspects of its operation that were seriously annoying, like forgetting flash settings AF having a mind of its own; in the end I almost never carried it and had to force myself to finish the roll for the review. I actually think it’s too bad that Olympus didn’t develop this concept further – a few sensible control tweaks and a metal shell, and it could have been something quite special indeed. Instead, for serious photographers on this much of a size budget, you’re better off looking at the XA instead – it was the predecessor to the Mju, designed by the legendary Yoshihisa Maitani (who also designed the Pen and Mju II) and packs a rangefinder, aperture priority, and exposure compensation. MT

The best place to find vintage gear is on the secondary market in Japan – send an email to Bellamy Hunt of Japan Camera Hunter; he can source to spec and budget. I get a good chunk of my stuff from him and can’t recommend him highly enough. Send him an email and tell him Ming sent you!

____________

Visit the Teaching Store to up your photographic game – including workshop and Photoshop Workflow videos and the customized Email School of Photography; or go mobile with the Photography Compendium for iPad. You can also get your gear from B&H and Amazon. Prices are the same as normal, however a small portion of your purchase value is referred back to me. Thanks!

Don’t forget to like us on Facebook and join the reader Flickr group!

appstorebadge

Images and content copyright Ming Thein | mingthein.com 2012 onwards. All rights reserved


Filed under: Film Diaries, Gearhead: Reviews

FD Shooting with the legends: the Leica M6TTL

$
0
0

_D90_DSC4109bw copy

Advance disclaimer: I’m not a full-blown Leica M nut, so most of my opinions are just that: opinions. But I’ve used a few of these things in my time, both professionally and for personal work. These images predate my recent DIY film efforts, so you’ll see a mix of color negative and slide film in there – I was mostly shooting Provia 100 and Velvia 100F at the time. The vintage of the images is also given away by the early watermark…

The Leica M6 series is perhaps the most accessible film Leica for most; I mean this in terms of both usability and price. A very large number of these cameras were produced in several key variants from 1984 to 1998; this volume means that prices on the secondary market have stayed relatively affordable. For not much more money over a ‘classic’ M2, M3 or M4, you can have something with slightly updated materials – likely resulting in longer service intervals – and of course, most importantly, a meter. With any of the classic M bodies, you need to use an external meter or an experienced eyeball to determine your exposure. Ignoring the design oddity that was the M5, the Minolta-collaborative CL and the more recent (and expensive) M7 and MP, we’re left with the M6 for most people if you want a film M camera with a meter.

m6-002-21 copy

Though the M6 requires a battery to operate the meter, the camera itself is fully mechanical: it will work just fine without the battery. The shutter mechanism – and of course film advance – is powered by springs, gears, and that winding tab. This is in contrast to the later M7, which requires batteries to operate the shutter. The MP does not, but it’s also significantly more expensive – and is an upgraded version of the M6 anyway. The M6 had several major variants – a plain old ‘M6′ (classic) that has the meter but no TTL flash metering or hotshoe contacts; the M6J, which was a limited edition fitted with a high magnification 0.85x finder, and finally, the M6 TTL that added TTL flash metering and the necessary hotshoe contacts. There are also a mind-boggling array of limited edition variants based off this camera – around 31, if my math is correct – making them not really that limited at all; there were six thousand of the M6 Titanium made alone. This is reflected on the secondary market, too – an M6 Titanium doesn’t cost that much more than a regular M6 TTL.

m6-002-09 copy

Enough on the collector-geekery. What you get with the M6 is the same formula that Leica have used for all their M cameras: cloth focal plane shutter, running from 1-1/1000s with 1/50s x-sync and bulb modes; manual exposure only. Set the aperture on the lens, focus and compose via the parallax-corrected rangefinder, set your shutter speed via the triangles and dot in the finder (under, correct, over). The meter is a simple center-weighted affair that takes a reading off a light-coloured circle painted onto the front shutter curtain; it theoretically shows exposure two stops in either direction; the illuminated dot means you’re at what’s metered; circle and triangle is one stop either way, triangle is two or more stops. Then hold the camera to your eye, brace it with your thumb in the crook of the wind lever and the body. Hit the shutter release, and wind on.

m6-001-09 copy

What really sticks in your mind after shooting with an M6 are a couple of things: firstly, just how smooth and silent the shutter mechanism is; for those who’ve only experienced the digital M8 or M9 / M Monochrom, you’re in for a surprise. This type of shutter feel is precisely why Leicas were renowned for their stealth; the buzzy M8/9 shutters are a loud disaster by comparison. And they’re notchy, too – the buttons lack the progressive hair-trigger feel of the M6 which you can modulate to the nearest ounce of pressure. The new M240 is a significant improvement over the M8/9, but still nowhere near as good as the mechanical cameras. Film advance on the M6 is similarly smooth; I actually like the slight bit of give in the articulated plastic tip of the M6′s wind lever as compared to the MP’s solid metal piece. It’s also less likely to scratch the edge of your shutter speed dial.

m6-002-23 copy

The other thing is not so good: loading. I suppose this is true for any M camera; chances are, you’re going to misload it a couple of times in your first few attempts. This was my first film Leica, coming from an M8; though not my first serious film camera, of course. The first roll went in fine; you have to take off the bottom plate, flip up the back window to thread film cleanly through the film gate (the back window is a pressure plate to keep the film as flat as possible across the entire imaging plane) and then slot the end into one portion of the three-lobed takeup spool at the other end. Easy, right? Not really. Not only are you juggling various openings and levers, you’ve also got to ensure that the film winds properly at the other end. I discovered the best way to do this was to advance one frame, then use the rewind crank to tension the film; fire off a second frame, and if the rewind crank moves when you advance the film, the two ends are connected – via the film – and you’re good to go. If it doesn’t wind, and you can continue to spin the rewind crank in the rewind direction, start again. Do not wind the film back into the cannister – you will almost certainly land up losing the leader inside!

m6-002-08 copy

Rather embarrassingly, I learned this the hard way: I about 20 images on my second or third roll, confident that I had some great stuff, then happened to notice the rewind crank wasn’t moving on film advance. And it was loose. And I could rewind it easily. Uh oh…I exposed the leader with 20 great images that day. Since then, I didn’t have a single misload because I made sure to run through the little dance above. It’s still admittedly a lot more hassle than putting a roll into the F6, for instance. Curiously, I’ve never misloaded a Hasselblad even though it’s significantly more fiddly.

76440033 copy

Rangefinder cameras are really all about the viewfinder: the ability to have a bright, clear window on the world that’s uninterrupted by the shutter or mirror cycling. You also have the added bonus of seeing outside your framelines, which can help with anticipating action as well as seeing how you might better alter your composition. It’s a double-edged sword, however; framing precision isn’t great, and the sole focusing point is the rather small rangefinder patch in the center; it’s probably why we also tend to see a lot of RF images with central subjects – by the time you focus and recompose, the subject has moved and the moment has gone. I also found that the 0.72 magnification finder I had wasn’t so good with wide lenses and spectacles; I’d rather have had the 0.58 since I shoot mainly with 28 and 50mm on my rangefinders. Finally, it’s worth knowing that some versions of the M6 and M6TTL have viewfinder flare issues: if a bright source strikes the RF window at a certain angle, the RF patch can flare out and disappear in the finder, making focusing impossible. It’s fairly easy to shade it with a finger on your right hand, but later cameras had a slightly modified internal design that also later made its way into the MP.

76440026 copy

I think if I was to buy an M6 again, I’d probably go for one of the Titanium versions – it isn’t solid titanium by the way, just coated – it’s uncommon enough to be special, common enough to not command too much of a premium over the regular M6, retains the classic two-tone look of the chrome/black Leicas, but is a bit more stealthy; don’t worry too much about the TTL vs non TTL decision. I’ve never used a flash with one of these things, and I suspect the vast majority of most people don’t either; it simply goes against the whole M gestalt in my opinion. I would probably change the ostrich leather for griptac, though. MT

The best place to find vintage gear is on the secondary market in Japan – send an email to Bellamy Hunt of Japan Camera Hunter; he can source to spec and budget. I get a good chunk of my stuff from him and can’t recommend him highly enough. Send him an email and tell him Ming sent you!

____________

Visit the Teaching Store to up your photographic game – including workshop and Photoshop Workflow videos and the customized Email School of Photography; or go mobile with the Photography Compendium for iPad. You can also get your gear from B&H and Amazon. Prices are the same as normal, however a small portion of your purchase value is referred back to me. Thanks!

Don’t forget to like us on Facebook and join the reader Flickr group!

appstorebadge

Images and content copyright Ming Thein | mingthein.com 2012 onwards. All rights reserved


Filed under: Film Diaries, Gearhead: Reviews, Leica

FD Shooting with the legends: the Nikon AI-S 58/1.2 Noct-Nikkor

$
0
0

_6001427 copy

The Noct-Nikkor is perhaps one of the most legendary – if not the most legendary – of the lenses in the Nikon pantheon. Hitting the market in its first AI version in 1977, it was designed to do two things: firstly, be shot wide open, and secondly, push the limits of the F mount’s relatively narrow diameter with a lens that would collect enough light to shoot relatively slow film at night, and without a tripod. Although based on a traditional double-gauss design, the lens incorporated one enormous technological advance for the time.

_8036009 copy

That advance was the replacement of the front element with an aspherical design to combat the effects of sagittal coma; in plain terms, this is the tendency for point light sources to ‘smear out’ at large apertures, especially towards the edges of the frame. The aspherical element is both a bit larger than it needs to be – so the edges of the lens aren’t used – and more critically, was polished by hand. I believe this is due to the tolerances required for production of the element; it’s certainly not possible to see that irregular curvature from the block diagram alone. When they were still available new, the price of the Noct was three times higher than the 50/1.2 – almost entirely due to the cost of producing that single element. Today, the 50/1.2 is still available new for about $700 from B&H, which would have made the Noct about $2100 in inflation-corrected terms. However, the reality is that since so few were produced – about 2,000 of the AI version, and 9,000 or so of the AI-S version, made up to 1997 – they tend to command healthy premiums today; lenses transact in the $3500-$4500 range depending on condition. Although buying one was fulfilment of a minor dream for me, it still makes me nervous every time I take it out.


The regular 50/1.2 AI, which is still in production and available new (image courtesy Nikon)


The 58/1.2 Noct-Nikkor – note front element (image courtesy Nikon)

By any measure, that seems like a lot of money to pay for another half a stop of light-gathering ability and a very strange 58mm focal length; the question as always is, is it worth it? I actually find this very difficult to answer objectively. Any Nikon afficionado worth their salt will tell you they have a special place for the Noct because of what it is, similar to the Leica Noctiluxes; however, I’ve found that unlike the Leica Noctiluxes, they don’t seem to be quite as limited in their shooting envelope. Firstly, the Noctiluxes are significantly larger and heavier, and have a reduced near focus limit of 1m vs 0.7m for the f1.4 Summiluxes; there’s also a much longer and slower focusing throw, and the odd ‘swirly bokeh’ that people either tend to love or hate.

_8036031 copy

I prefer to think of the 58 Noct as a fast 50 or fast 55 or steroids; granted, the regular SLR normal lenses never seemed to be quite as good as their rangefinder counterparts (something I’ve never been able to figure out) but there was a definite, tangible increase in optical quality as you moved up the range. Whilst the f1.8s might be excellent by f2.8 or f4, the f1.4s were excellent at f2, and so on. (The exception to that is the new f1.8G, which has aspherical elements and is excellent from f1.8, even on the demanding D800E, but I digress.) In the past, I owned both the 50/1.2 and the 55/1.2; I paired these lenses together with a D2H in a quest to find more speed and to counter the limited low-light abilities of that camera. The 50/1.2 was a bit better than the 55/1.2, being an newer design, but both couldn’t really be called critically sharp wide open – and that was on a camera with nearly 9-micron pixels! It was clear to see that the 55/1.2 suffered from internal flare and coma quite badly when used at f1.2; it was as though a soft portrait filter was being applied to the image. It wasn’t a bad thing for high contrast situations and portrait work, especially with the limitations of earlier digital sensors, but it certainly lacked bite until f2.8-4. Call it ‘character’, I suppose.

_8036104 copy

What the 58 Noct does do is bring the high quality ‘usable’ shooting envelope closer to the maximum aperture; there are traces of reduced microcontrast wide open at f1.2, but by f1.4, things are razor-sharp across most of the frame, and f2 is excellent – even on the D800E, which surprised me. On 35mm film, the lens is very good even wide open, but oddly displays some mild focus shift wide open which I don’t see on the D800E. Coma is of course very well controlled well into the corners, as we would expect from that front element. There’s a bit of CA until you stop down, but at f4 it’s all gone, and the lens is resolving far, far more than even Acros 100 is capable of, and matching the D800E. Needless to say, bokeh is excellent at every aperture – as we would expect from a lens with a nice round 9-bladed diaphragm (earlier versions had 7 blades).

_8036018 copy

I have to admit, beyond purposes of testing, I’ve not shot this lens on the D800E – for the simple reason that it’s very difficult to achieve critical focus without using live view on a tripod; that camera’s focusing screen is simply rubbish for manual focusing. Not to say that it doesn’t make a good match on digital, but you’ll probably get more utility out of the f1.4G version if you need autofocus simply due to increased resolution from better focusing precision. Personally, I think it definitely displays its character best on film; it’s lived mostly on my F2 Titan, where it looks very at home, and lately also the F6, which has proven to be an interesting combination. I certainly don’t think it’s for everybody, but if you’re an aficionado of lenses with charachter, and a Nikon fan: there is only one Noct-Nikkor. MT

(An excellent history of the Noct is available here at the Nikon imaging site.)

The best place to find vintage gear is on the secondary market in Japan – send an email to Bellamy Hunt of Japan Camera Hunter; he can source to spec and budget. I get a good chunk of my stuff from him and can’t recommend him highly enough. Send him an email and tell him Ming sent you!

____________

Visit the Teaching Store to up your photographic game – including workshop and Photoshop Workflow videos and the customized Email School of Photography; or go mobile with the Photography Compendium for iPad. You can also get your gear from B&H and Amazon. Prices are the same as normal, however a small portion of your purchase value is referred back to me. Thanks!

Don’t forget to like us on Facebook and join the reader Flickr group!

appstorebadge

Images and content copyright Ming Thein | mingthein.com 2012 onwards. All rights reserved


Filed under: Film Diaries, Gearhead: Reviews

Ultimate tripod heads, part one: the Arca-Swiss C1 Cube

$
0
0

_5027057 copy
Arca-Swiss C1 Cube with D800E mounted via universal L bracket.

Arca-Swiss are known for two things: producing excellent precision photographic gear, and having spotty availability – probably due to very small production runs. This two part review is going to cover what I think are two of the best tripod heads currently available – the P0 and C1 Cube. I picked up the P0 from B&H as a lightweight travel head during my trip to New York earlier in the year; I’ve been using it since – more often than I’d imagined I would. After being very impressed with the little one, I requested a C1 Cube as soon as it finally became available; both out of curiosity, and also to see if the hype was true.

Let’s start with the C1 Cube.

_5027044 copy
This…

_5027049 copy
…turns into this.

The purpose of a geared tripod head is all about precision: the ability to move the camera in small, defined and repeatable increments makes life easy for anybody who has to frame very precisely. (Of course this is significantly less useful if you are using a rangefinder, non-TTL viewfinder or non-100% finder.) There are only a few options if you need such a device; unsurprising because it’s quite a specialized piece of equipment – there’s the Manfrotto 410 and 405 heads; the Arca-Swiss C1 Cube (reviewed here), the Arca-Swiss D4 geared ball, and Korean almost direct copy of the Cube – the Photo Clam Multiflex.

I’ve been using the 410 for the last year; it’s served me well but has a few annoying niggles: firstly, the odd shape and size makes it tough to pack on assignment; secondly, it doesn’t move the camera about the same central point, so you frequently have to tweak the other axes after repositioning one of them. Lastly, there’s an ever-so-slight bit of play in the axes because they do not really lock down other than by sprung knobs: not noticeable with the D800E, but occasionally noticeable with the Hasseblad, digital back and long exposures. It does offer some advantages over the Cube, however: a much greater range of travel in the axes (120 degrees on both lateral axes, full circle around the base), quick-unlock and quick-positioning functionality, and a geared pan base. If you want to work fast, but need final precise tweaking of position, this is the one to have.

_5027062 copy
One more gratuitous shot of the Cube; it’s rare that equipment turns into something to be photographed, but this is one of those exceptions. It’s a mechanical work of art.

The Cube really needs to be used with an L bracket, however – it moves through just +/- 30 degrees on each of the lateral axes. In any case, this is the correct way of doing things anyway to maintain proper centre of gravity; it’s just that the Manfrotto L bracket for the 410 proved evasively impossible to find. Combined with an L bracket, the Cube actually offers greater positioning flexibility; not to mention two pan bases – so you can use the bottom one to position the head, and the top one to stitch with. Neat. If you really must dump the whole thing sideways, you can – the base contains a hidden hinge that tilts through 60 degrees, with the remaining 30 degrees taken up by the geared track in that axis.

Overall build quality of the Cube is superb – fit and finish is every bit what we’d expect from an Arca-Swiss product, and one costing the best part of $1700 – excluding quick release plates. (No, that’s not a typo.) It’s a solid lump of aluminum, weighing nearly 1kg; this head is best deployed on a very sturdy set of studio legs, like the Gitzo GT5562 I use. There is no play or flex anywhere, and that includes in the geared knobs; which move smoothly yet have absolutely zero backlash thanks to a syncromesh-like gearing system. There’s also a tension adjustment for both axes, too. The pan bases are ungeared, but very smooth and operate with just the right amount of resistance for precise positioning. They feel much like a video fluid head, actually. Though the edges are ostensibly sharp – it is a ‘cube’ after all – they are bevelled and won’t cut you. The top deck also has a pair of bubble levels – one for each axis – built in. Interestingly, the Cube has no load rating published – looking at the way the thing is constructed, I can’t imagine any piece of photographic equipment that will tax the head before other parts of your support system – probably the QR clamp, if anything. It remains to be seen how well the exposed gear tracks hold up to dust and grit over time, however. I’ve not heard about any problems online even from early owners, so I’m inclined to believe it’s probably a non-issue.

There is one catch, however. And that’s in the QR clamp mechanism. It operates in two stages, requiring movement of a little catch each time to release – so your camera doesn’t fall off by itself. Good, right? Not really. Unlocking the first stage enables release by sliding; unlocking the second stage basically means the camera will fall right out – the grooves move far apart enough that the dovetail releases completely. There is no safety on either end to stop the camera sliding out with shorter plates, either. And on top of that, the lever doesn’t really lock down in the tight, secure way of the Manfrotto clamps – there’s a bit of give to it, and you have to test it to be sure. Not good, especially on a head of this price; what’s wrong with a threaded locking knob that can only open far enough to permit sliding, but not complete vertical removal?

At this point, the obvious comparison is to the Korean copy: the Multiflex. You’d expect it to be quite a lot cheaper since most of the engineering was already done for them; no dice; In fact, it’s about $1400 – that’s over 80% of the price. I’ve handled this head on two occasions – once at a photo show, and once at a studio in KL. The finishing is noticeably rougher, and it seems that they weren’t able to make the knobs clear the housing – so the upshot is that the knobs stick on magnetically and must be removed for certain movements. If you lose a knob…good luck trying to find a replacement. Though it does have a significantly better QR clamp, I don’t think the relatively small saving is worthwhile simply because the action is nowhere near as precise.  MT

To be continued and concluded in part two with the P0 Monoball.

The Arca-Swiss C1 Cube is available here from B&H.
The Arca-Swiss universal L bracket to fit both Cube and Monoball (and any other compatible rail) is available here from B&H.

_____________________________

Enter the 2013 Maybank Photo Awards here – there’s US$35,000 worth of prizes up for grabs, it’s open to all ASEAN residents, and I’m the head judge! Entries close 31 October 2013.

____________

Visit the Teaching Store to up your photographic game – including workshop and Photoshop Workflow videos and the customized Email School of Photography; or go mobile with the Photography Compendium for iPad. You can also get your gear from B&H and Amazon. Prices are the same as normal, however a small portion of your purchase value is referred back to me. Thanks!

Don’t forget to like us on Facebook and join the reader Flickr group!

appstorebadge

Images and content copyright Ming Thein | mingthein.com 2012 onwards. All rights reserved


Filed under: Gearhead: Reviews

Ultimate tripod heads, part two: the Arca-Swiss P0 Monoball

$
0
0

_5027068 copy

The P0 Monoball; Manfrotto 394 RC4 QR plate is for me to standardize my connectors across heads, and also because the QR version of this head costs nearly 50% more than the standard one – you can buy the adaptor AND a lot of spare plates for the difference. I’ve since replaced it with an Arca-style clamp I found on eBay for about $25 - surprisingly well made, and cost-efficient, too.

Today’s conclusion of the two-part review (part one covering the Arca-Swiss C1 Cube is here) covers the much simpler, cheaper, but no less well built P0 Monoball. They aren’t direct competitors or replacements for each other; to be honest, there’s ample room in a gear bag for both since they fulfil very different photographic needs.

Starting at about $230, the P0 is one of the cheapest Arca-Swiss products you can buy; it isn’t compromised in any way. Unlike the conventional ball heads where the ball is mounted to the camera and the locking mechanism is in the base, the P0′s base is the ball, and the locking mechanism is in the head. This has two advantages – the camera can rotate much closer to the ball, improving precision of positioning, and the locking mechanism can be made more robust. The shorter moment also means that there’s less ‘droop’ on locking – especially important if the head is to be used with long lenses or for macro work. The cup (underneath the camera) contains a set of planetary gears that grasp the ball from all directions and provide a very secure hold indeed. Partially unscrewing the ring controls tension. There’s a wide-diameter grooved collar that runs around the outside of the cup that makes it easy to apply a significant amount of torque to firmly lock the head down; once locked down, the head doesn’t move at all. Immediately underneath the camera mount position is a locking pan base. Finally, a notch in the cup permits tilting the camera over 90 degrees.

The P0 comes in two versions – one with the QR clamp built in (but no plates) and one with a regular screw; simply because my other heads use the RC4 plate, I went for the version with the regular screw and purchased an additional adaptor to go on top. Regardless of whichever version, the head is surprisingly small – 60mm in diameter and about 300g in weight – yet load capacity is rated at 20kg – given how securely it locks down, I’m inclined to believe this. It makes the perfect companion to a lightweight tripod for travel, like the Gitzo GT1542 Traveller. In fact, this happens to be the exact same combination I’m using now. So far, it’s been tested under a wide variety of conditions from the studio to by the beach with surf spray, in the rain, and with sand blowing about; the head has performed flawlessly. It’s become an indispensable part of my travel kit, especially when shooting with medium format.

There’s really not that much to say about the P0: possibly the best kind of review. It works, and works very well. It is a piece of equipment that does its job flawlessly and doesn’t get in the way.

_5027065 copy
As you can see, it’s really quite a small head – perched on top for scale is an F6 and Zeiss 2/100 Makro-Planar.

Conclusions

Let’s start with the easy stuff: the P0 Monoball is a no-brainer. It’s one of the very few unqualified recommendations I feel happy making; I’d get the version without the QR adaptor so you can attach whichever one you happen to prefer. It’s solid, has zero play, supports a lot of weight, is built like a tank, and is light and small. If you need a ball head of any kind, buy one; at ~$230 it isn’t much more expensive than comparably specced traditional ball heads, either.

The trickier question is whether the C1 Cube is a worthwhile purchase or not; the very stiff price puts it out of consideration for most unless you are a very, very serious photographer. It’s one of those pieces of equipment you tend to know you need before you buy one. It is, unquestionably, a fine piece of equipment; one that is both beautifully made and completely functional. It moves with precision and confidence, and absolutely zero slop anywhere. The only thing that lets it down is the poor QR clamp design – frankly, if it were mine, I’d replace it with something sturdier and more decisive.

I suppose that’s the real question, isn’t it: if a photographer who specializes in the kinds of things I shoot, almost all of which require very precise positioning – watches, architecture, still life – can’t justify it in an imaging chain geared (excuse the pun) towards producing the highest output quality possible, then it’s going to be a tough sell to anybody else. My hesitation comes around the price. It unquestionably does a better job than the Manfrotto 410 I’ve been using up til now, but then again, it should – at more than five times the cost. Combined with an equally well-designed macro rail (I see an RRS in my future), this allows secure and precise positioning in almost any axis you can think of. In my couple of weeks using it, I’ve gotten so used to the way it functions – transparently, doing the job and not getting in the way or needing me to think consciously about it – that the problem is I can’t send it back.

The scary thing is that I can quite easily see a justification for having both items in your arsenal – the P0 is lightweight, fast to use, locks down solidly, and can hold a lot of weight – it’s the perfect thing to use when you don’t need millimetrically precise positioning and you’re on the go. I pair it with my Gitzo GT1542 Traveller without the centre column for the ultimate travel tripod; more than capable of supporting a Hasselblad and not weighing too heavily on your shoulders. The Cube would be for slower, more deliberate photography; the kind where the lighting setup alone takes you an hour, and the list of deliverable shots is just a few lines long. Work where precision absolutely counts. Hey wait, that’s right up my neck of the woods…


Excuse me while I go dig around behind my sofa in the hope of finding a few Benjamins. MT

The Arca-Swiss P0 Monoball is available here from B&H and Amazon.
The Arca-Swiss C1 Cube is available here from B&H.
The Arca-Swiss universal L bracket to fit both Cube and Monoball (and any other compatible rail) is available here from B&H.
The Manfrotto 394 low-profile RC4 adaptor is available here from B&H and Amazon.

_____________________________

Enter the 2013 Maybank Photo Awards here – there’s US$35,000 worth of prizes up for grabs, it’s open to all ASEAN residents, and I’m the head judge! Entries close 31 October 2013.

____________

Visit the Teaching Store to up your photographic game – including workshop and Photoshop Workflow videos and the customized Email School of Photography; or go mobile with the Photography Compendium for iPad. You can also get your gear from B&H and Amazon. Prices are the same as normal, however a small portion of your purchase value is referred back to me. Thanks!

Don’t forget to like us on Facebook and join the reader Flickr group!

appstorebadge

Images and content copyright Ming Thein | mingthein.com 2012 onwards. All rights reserved


Filed under: Gearhead: Reviews

Tilt shift world cup: Korea vs. Japan: Rokinon/Samyang 24/3.5 T-S vs Nikon PCE 24/3.5

$
0
0

_5027040 copy

In the left corner: the Rokinon (a.k.a ‘Samyang’, in some parts of the world) T-S 3.5/24 ED AS UMC, from Korea. In the right corner: the Nikon PC-E 24/3.5 ED. One weighs in at a hair under $2,000, the other, closer to $850. I have to be honest, the Samyang has only come onto my radar because of the enormous difference in price – I admit curiosity as to what we’re really giving up for the delta. The only real uses for these lenses – other than bragging rights – are to shoot architecture; Putrajaya’s Putra Mosque plays host to us for this testing session.

Technical notes: During this test, I shot both lenses from the same tripod position with the same settings on the barrels – distance, tilt, shift, aperture. Nevertheless, there are still some slight differences, which I think are a combination of sample variation and lack of precision in the focusing scales of both lenses; infinity to 1m are barely five millimeters apart on the barrel – about seven degrees of travel, by my reckoning. Live view was used to match subject sharpness as closely as possible. Testing was done on a D800E body, at base ISO with self timer used at all times, on a locked down solid tripod – a Gitzo 5-series carbon systematic and Arca-Swiss Cube head. Whole-shot sample images were shot using the Nikon; in the A-B comparisons, the Rokinon is always the warmer image.

_8038642 copy

I think it’s necessary to start with a little background on why movements are required at all. Firstly, in all of these images you’ll notice my verticals are perfectly vertical – there’s no keystoning despite the perspective and physical camera location. This is due to the ability to shift the lens: you can effectively project a vantage point higher than your physical one by raising the optics up. Geometrically, this uses a peripheral portion of the lens to project an image onto a sensor. If you need extended depth of field beyond what you can achieve by stopping down, then the only choice is to tilt the focal plane – this extends depth of field beyond the normal distance, and in three dimensions.  Imagine the imaged area – in focus, framed – as a rectangular block standing on one edge. By tilting and shifting the lens, the block can be laid down, moved up and down, and tilted. It’s a bit more complicated than that, and requires some practice to use with fluency, but that’s the gist of it.

The Nikon is a fairly familiar lens to me – I’ve used it on several occasions in the past for architectural work. Build quality is excellent, it has mostly excellent optics with a few minor qualifications, and one big shortcoming: the tilt and shift axes are not independently rotatable. The lens itself is almost entirely metal, very solidly built, is fully gasketed and weather-sealed, and has smooth geared controls for moving the axes, as well as lock knobs for securing position*. The focusing ring is perfectly weighted and well damped for precise positioning; it could use a bit more throw near the infinity limit, though. There’s an aperture ring whose position overrides the command dial selection on the camera body; it has an ‘L’ position at one end, which when selected returns aperture control to the camera. The PCE’s are unique in the Nikon lineup for having electromechanical diaphragm control only (all other Nikkors are mechanical, triggered from the camera body). This means unlike the previous 85/2.8 PC-D which stopped down with a plunger, all of the current PCE lenses require and electronic body for full functionality – unless you want to shoot wide open. They will not work properly with older bodies. It’s probably also worth mentioning that for the extra money, the lens includes the customary velvet baggie to store it in, along with a dedicated hood.

Note: on Nikon bodies with a built in flash, you can only rotate the lenses – both of them – one way and they must both be mounted with the movements at neutral: otherwise you won’t have enough clearance. Unfortunately, this also means that you can’t access the lock knob for some axes in some orientations because it’s small and directly blocked by the prism. Oddly this isn’t a problem I’ve had with the 85 PCE, but then again I think it’s because the lock knobs are further forwards.

_8038679 copy

By contrast, the Rokinon forgoes the hood but includes a slightly less-nice baggie (I don’t even think there is a hood for it) and is completely mechanical – there aren’t even any electrical contacts on the lens, which means you’ll have to use a D7000 or higher to get automated metering. It’s also got an awkward 82mm filter thread (the Nikon is 77mm). The aperture is stop down only, which means your viewing aperture is also your shooting aperture; you’ll have to add another step to the workflow in opening up to focus, then stopping down again to shoot. A little too easy to forget if you’re in a hurry, personally. Build quality is a step up from the plastic-fantastic consumer zooms, but not by much. The focusing ring has a gritty feel to it and more resistance in some places than others; the aperture ring detents aren’t very deep and easy to knock off. There is certainly no weather sealing, and though the weight suggests there’s some metal in the lens, the feel makes it difficult to pinpoint exactly where, besides the mount.

_8038695 copy

By far the worst thing about this lens is the locking and geared movement knobs for the tilt and shift axes, however. The diameter of the locking knobs is very small, so it’s difficult to bolt down securely – if left unlocked, the lens will drop to its lowest position – by comparison, the Nikon does not. Compounding this is relatively low resistance to movement in both axes and poor choice of gearing ratios, making it difficult to adjust the lens in the precise small increments required for this kind of technical photography.

_8038657 copy

But the Rokinon has one enormous saving grace: it can rotate its tilt and shift axes independently, something which the Nikon cannot do. This is incredibly useful in practice for both architecture and landscape as it means you can combine rises with tilts for greater DOF and perspective correction; the Nikon gives you one or the other. You can have the axes rotated 90 degrees at a service center, but that’s permanent and requires a new cable flex to join the two halves of the lens – something which Nikon (at least in Malaysia) are happy to charge you the better part of $400 for. This is daylight robbery on top of an already expensive lens which should just have been designed with a slightly longer cable flex to begin with, so swapping axes would be as simple as removing and rotating the back mount**. Better yet, design the damn thing so the axes rotate independently in the first place. Both lenses offer +/- 8 degrees of tilt, and +/- 11mm of shift on the Nikon, +/- 12mm on the Rokinon.

**They did it on the earlier 85/2.8 PC-D.

_8038676 copy

I think at this point it’s clear that both lenses have their strengths and shortcomings. But what about the most important part: the optics? The Rokinon runs a 16/11 optical formula, with two aspherical and two ED elements. The Nikon is a more sophisticated, but simpler, 13/10 design with three aspherical and three ED elements, plus Nano Crystal Coating and a rounded 9-blade diaphragm. The Rokinon has six blades and a UMC coating. Given that most of the time, these lenses will be used in controlled situations – i.e. stopped down and on a tripod – I didn’t bother to test wide open performance in detail; I can’t actually forsee any situation in which you’d have to shoot these wide open – unless perhaps future DSLRs have such high pixel densities that diffraction comes into play at say, f4. Consequently, most of these tests were done between f8 and f11.

_8038692 copy

Nevertheless, with all movements in the zero position, it’s clear that the corners on the Rokinon are much softer than the Nikon until f8, at which point there’s actually not a lot to choose between them. The Nikon improves a little from wide open, but it starts out already very good. It’s a similar story with near performance: both lenses will focus down to about 0.2m, which makes them good for very dramatic perspectives – though not very accurate rendering due to geometric distortion. Both lenses are excellent in the center, with the Rokinon exhibiting edge fall off until stopped down significantly; the Nikon is much, much better in this regard.

comparison 3 center
First set of A-B comparisons. Rokinon is on the left, Nikon on the right. Click here for 100% views – the magnifying loupe shows actual pixels. Crop 1 2 3 4

Stopped down to f8, it’s a different story. Both lenses are sharp across the frame except for the extremes; there’s a hair more CA on the Rokinon and the Nikon has better microcontrast and transmission (to be expected thanks to its sophisticated coating). Neither one does well at the edges of its image circle – i.e. the extreme movements – and the D800E is particularly revealing in this regard. I wouldn’t go beyond 5 degrees of tilt or 8mm of shift on either lens; things at the far edge start to fall apart visibly after that. It’s not coma, it’s not CA, it just appears that the lens is having trouble focusing all of the light rays to the same point. In practical terms, there’s actually not a lot to choose between them in terms of resolution and rendering style, except for two areas: color and vignetting.

comparison 2 edge
Second set of comparisons. Again, the Rokinon is on the left. Crop 1 2 3

The Nikon vignettes heavily at the edge of its image circle; you can correct for this, but curiously it isn’t necessary on the Rokinon. This limits practical movement distance a little more, I think. The Rokinon suffers from color casts; images are warm and hue-shifted orange. It’s not an even spectral shift either, so this isn’t something that can be corrected for via the eyedropper tool – you’ll have to profile this lens separately if you want it to match the other glass in your collection. The Nikon of course renders like every other modern N-coated, ED Nikon – high macro contrast, moderate to good microcontrast, neutral to slightly cool color, and very saturated.

comparison foreground corner
Final set of comparisons. Rokinon on the right. Crop 1 2 3 4

It’s worth noting that in many of these cases, the lenses’ depth of field profiles do not match up
even though they were set to the same movements and focusing distances; furthermore, I also double checked the focus point with maximum magnification in live view. Miscalibration somewhere? Sample variation? Or very small movements producing noticeable effects? Possibly all three. I personally suspect the culprit is the Rokinon’s rather vague center tilt detent and somewhat loose locking screw; though when there’s movement of any sort involved in a lens coupled to a very high-resolution sensor, in a way you’re really asking for trouble.

And here we come to the crux of the problem: is the Nikon worth $1,150 more? I don’t think the answer is that clear cut, actually. There is no question, in my mind, that the Nikon is a much better built lens. It feels every bit of its price premium, and this comes through in ergonomics in use, materials and overall feel. Optically, though, whilst the Nikon is slightly better – I wouldn’t say it’s a world apart in practical use unless you’re going to use it at maximum aperture, or near it. And if you’re using an older film body, then the discussion is moot because it simply won’t work at all. Here’s the way I see it: if you’re on a budget, use a Sony or an older film body, or need independent rotating axes, buy the Rokinon and be prepared to spend some time color profiling the lens. Then tape the aperture to f8 and leave it there, and be prepared to pinch your fingers when you unlock the lens and it droops on its own. In all other cases, buy the Nikon (or take a good look at the Canon). MT

Both lenses are available from B&H – the Rokinon 24/3.5 TS is here in Nikon, Canon and Sony Alpha mounts, and the Nikon PCE 24/3.5 is here.

_______________________________________

One last seat has opened up for the Prague workshop (2-5 Oct) due to a participant’s conflicting work commitments. Now available at the special price of $1,900 instead of $2,150!For full details and to make a booking, click here. Thanks! MT

_____________________________

Enter the 2013 Maybank Photo Awards here – there’s US$35,000 worth of prizes up for grabs, it’s open to all ASEAN residents, and I’m the head judge! Entries close 31 October 2013.

____________

Visit the Teaching Store to up your photographic game – including workshop and Photoshop Workflow videos and the customized Email School of Photography; or go mobile with the Photography Compendium for iPad. You can also get your gear from B&H and Amazon. Prices are the same as normal, however a small portion of your purchase value is referred back to me. Thanks!

Don’t forget to like us on Facebook and join the reader Flickr group!

appstorebadge

Images and content copyright Ming Thein | mingthein.com 2012 onwards. All rights reserved


Filed under: Gearhead: Reviews

How I landed up going medium format digital…

$
0
0

A4517609 copy

Earlier in the year, many of you saw me post the image of the Hasselblad 501CM hanging off a tripod at 90 degrees near the surf line. Several asked why on earth would I need to turn a square format camera sideways; apart from the obvious answer of ‘to shoot vertically!’ there’s definitely more than meets the eye. Firstly, Hasselblad did actually produce an A16 645 format magazine for the V-series bodies; they’re relatively rare nowadays and must obviously be used with the correct focusing screen to ensure accurate composition. In addition to being better suited to the typical print rectangles, you also get 33% more images per roll of 120 (16 instead of 12, as the name suggests). I was using something a little more exotic; though like the A16, it isn’t rotatable and so requires you to turn the camera through 90 to shoot verticals. It’s not very convenient, to say the least.

A4517116bw copy

I’ve dallied with medium format digital on several occasions – pairing the Leica S2 off against the D800E here, for instance; taking the Hasselblad H4D-40 for a trial here. Neither of those cameras did it for me: the Leica had perhaps the best lenses I’ve ever seen, though the whole shooting experience was just far too similar to a large-ish 35mm DSLR to make me shoot and see differently. And there wasn’t that much gain over the D800E, either. The H4D-40 felt clunky, slow, a little loose, and quite frankly, enormous. I wasn’t able to shoot fluidly with it at all.

A4517500 copy

Shortly after getting my first V-series camera – a 501C – I borrowed the CFV-39 digital back from the regional distributors, Shriro, to take for a test run. In short: I hated it. So how come I landed up buying the very same back six months later? Simple: turns out the first body didn’t play nice with the back; not only did it have triggering issues, but it also had mirror alignment issues that meant that what was passably sharp on film thanks to the thickness of the emulsion was just out by enough on the digital back to cause noticeable back focusing issues. I thought it was the back, since the film results were acceptable*.

*I’ve since dismantled and re-aligned the mirror of that camera, and both film and digital results are significantly better. The higher the resolution, the more critical focusing precision becomes – as no doubt many D800/D800E users are now aware.

A4517010 copy

The second time I demoed the CFV-39 was back at the distributors’ offices; they were having a demo/ loan gear clearance after the official discontinuation of the V series. I went in to pick up some spare A12 magazines, perhaps a meter prism and bellows. The latter two items weren’t available, but an ex-demo H4D-50 and the same CFV-39 digital back was also in the pot: out of masochistic curiosity, I tried both the H4D and CFV again – this time with a different (and newer) 501CM body very generously gifted to me by one of my readers. I shot tethered and with the camera on my heavy Gitzo 5-series systematic tripod just to rule out any possible stability issues.

A4517581 copy

Let’s just say the difference was night and day: while the H4D-50 still wasn’t doing it for me from a handling point of view, the CFV was now on song. It’s relatively fat 6+ micron pixels were delivering wonderful levels of detail and acuity, and color was perhaps the most accurate I’ve ever seen straight out of camera. My credit card made an appearance, I took the customary anti-fraud phone call from the bank (“Did you just spend X at X?”) and the back followed me home. It might not have that much more raw resolution than the D800E, but the pixel acuity is still a notch up, I feel – to say nothing of color reproduction. Sadly though, the sensor was not full frame 6×6 – and aside from the 1999 Dicomed Bigshot series, there have not been any 6×6 sensors since – it’s a 1.1x 645 with 1.5x 6×6 crop – if that sounds confusing, it is. Basically, what we have is a 49x37mm sensor with 39 MP; there’s a special etched focusing screen you need to use in order to get accurate framing. You can shoot the back in either 37x37mm or 37x49mm modes; 37x37mm mode is a 1.5x square. In 37x37mm mode, you basically have a FX 35mm DSLR with 50% more at the top**. I don’t actually think it makes any sense to shoot in 37x37mm mode unless you’re really running out of card space; you might as well compose with the square lines, shoot the full area, then crop in post. You never know when the extra might come in handy – especially for commercial work.

**Not strictly a like-to-like comparison; if you cropped square from a FX 35mm camera, you’d be using a 24x24mm capture area.

A4517074 copy

The relationship is theoretically a bit like DX to FX, but somehow, just like DX and FX, the lenses don’t quite render the way you’d expect them to. The 80mm normal I’d become used to (and which feels extremely natural on a 6×6) was now a bit too long for both the 645 frame and the 1.5x 6×6 frame; 50mm works well to match the field of view, but you lose that slight telephoto compression from the 80mm that’s part of medium format’s ‘normal angle of view’ signature. It took me some time to figure out my focal lengths again, after having gotten used to a 50-80-150mm combination on 6×6 film to replicate my preferred 28-50-90mm fields of view (in 35mm equivalent). For 645, I find that the 150 and 120 still work great; the 50 is too much like 35mm on FX 35mm format for my liking, so I only ever shoot it square; the 80mm is slightly too long for normal, and becomes a short telephoto when used square. Confused yet? So am I. I think I need a 40mm to restore my wide field, and I’ll use that along with the 150mm and pretty much leave it at that for digital. I’m sure familiarity will come in time and with more use, though.

A4518462 copy

I have to admit that I haven’t really shot with the CFV as much as I’d like to; partially because of existing work commitments, jobs that aren’t really suitable for medium format (mainly watches) and the review queue backing up – in fact, most of the time when I do have time to shoot, it’s with cameras that are for review. (It’s a little frustrating at times because I’d really like to use my own gear.) I have tried shooting some street with the CFV; it’s not as bad as you’d think other than when it comes to getting a vertical, then people really look at you strangely. Otherwise, the experience is actually very much like shooting with the film V-series – so long as you remember the crop factor, and get your focal lengths right.

A4518360 copy

That brings us full circle: the camera was sideways because it was one of the few opportunities i had to try out the back properly; instead of going on holiday like a normal person, I packed a full medium format digital kit and proceeded to do some experimentation. If I didn’t, then there’s no way I’d be confident enough to use the gear on a future job – just too many unknowns. (It’s also just as well I did, because the back had an error with it’s DSP board and had to go back to Sweden for an interlude and a new board; it was repaired under warranty and came back about a month ago.) I wouldn’t have for instance found that the same battery seems to go forever; you can get hundreds and hundreds of images out of it before charging; nor would I have found that mirror lockup makes a significant difference, even at the maximum 1/500s shutter speed, and with pretty much every focal length. It doesn’t do anything above base ISO well, and you can’t really use it handheld unless shooting with at least 1/3x the focal length – the pixel density per degree AOV and huge mirror slap make it even more prone to camera shake than the D800E. It’s also got incredible native dynamic range, but very little latitude for correction or tolerance for error; this is the kind of camera that requires shot discipline of a whole different level to conventional DSLR gear.

I also wouldn’t have a couple of really nice 30″ prints from that vacation now, either; it’s very important to note that there’s really no way you can appreciate the output in a web jpeg; even full-screen on a good 27″ monitor still pales in comparison to a good print (and here’s why). Perhaps I’ll throw these into a future print run.

A4518384 copy

During the brief period I had 903 SWC in my possession, I tried the CFV on that camera too; it didn’t work that well simply because the rear element of the Biogon is too close to the sensor, and without microlenses or telecentricity, corner results were quite poor. Too bad, as it actually made for quite an interesting street photography camera – a 28mm-equivalent, hyperfocal/ zone focus medium format compact. In hindsight, I have to admit that purchasing the CFV-39 was much more of a case of ‘I want’ than ‘I need’ – probably a good thing it wasn’t the CFV-50 – but then again, isn’t that so much of photography for most of us anyway? MT

_____________________________

Enter the 2013 Maybank Photo Awards here – there’s US$35,000 worth of prizes up for grabs, it’s open to all ASEAN residents, and I’m the head judge! Entries close 31 October 2013.

____________

Visit the Teaching Store to up your photographic game – including workshop and Photoshop Workflow videos and the customized Email School of Photography; or go mobile with the Photography Compendium for iPad. You can also get your gear from B&H and Amazon. Prices are the same as normal, however a small portion of your purchase value is referred back to me. Thanks!

Don’t forget to like us on Facebook and join the reader Flickr group!

appstorebadge

Images and content copyright Ming Thein | mingthein.com 2012 onwards. All rights reserved


Filed under: Articles, Gearhead: Reviews, On Photography

The 2013 Olympus OM-D E-M1 review, part one: the camera

$
0
0

_8038907 copy

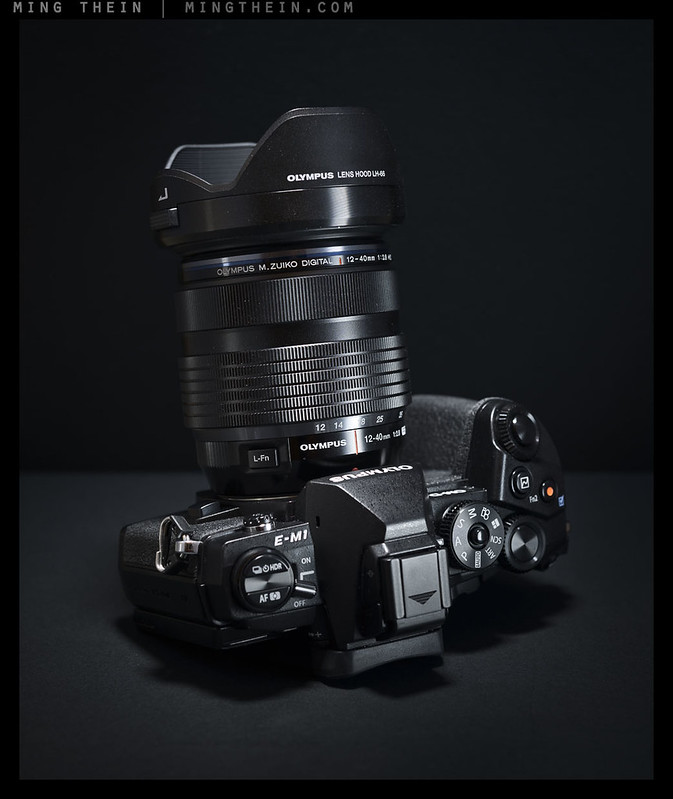
The late-2013 OM-D E-M1 is the successor and upgrade to the very popular early-2012 OM-D E-M5. It’s now clear why the camera was launched with a mouthful of two names: OM-D is a line of products, E-Mx is the model. In this review, we will refer to them as E-M1 and E-M5 respectively to avoid confusion. As you all probably know, I’m very familiar with the E-M5; this camera has served as my travel and teaching camera for the last year, and has now clocked somewhere north of 40,000 exposures (I also reviewed it here). What’s changed in a year? Quite a lot, it seems: certainly enough to get excited about. There’s also a new confirmed lens – the 12-40/2.8 M.Zuiko PRO, available with the camera, and a matching f2.8 telephoto for next year.

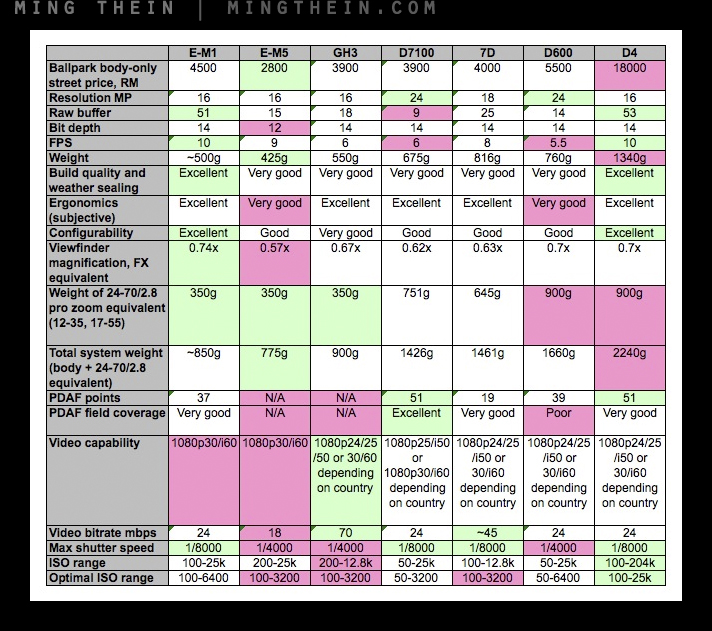
This review will be in three parts for ease of reading (this part is already north of 4,400 words) – the camera itself, today; a relative comparison with two other benchmarks, tomorrow; and a review of one of the two lenses announced with the camera shortly thereafter – the 12-40/2.8 M.Zuiko PRO. A quick note on testing methodology: a range of lenses were used for the review, including the new 12-40, the 50-200/2.8-3.5 SWD for 4/3rds, the 12, 45, 60 and 75mm primes, and the Panasonic 14-42X. You won’t find full size images here due to image theft/ IP issues; go by what I say not what you see – there’s an enormous difference between a small web JPEG that’s been attacked and oversharpened by Flickr’s downsizing algorithm and a full sized one or a RAW file in any case, plus of course the monitor matters. There will be 100% crops where noted, however.

A set of images shot with the E-M1 will be here on my flickr page, and continuously updated as I use the camera more.

_8038925 copy

_8038931 copy

None of the headline spec is a surprise*: all-new Live-MOS 16MP sensor with phase detection AF on chip, a new image processor (TruePic VII), no AA filter, 10fps in AF-S mode, 6.5fps in AF-C tracking mode in conjunction with the PDAF system – and to make the most of that, the buffer is now 40 RAW frames at 10fps, or 51 at 6.5fps; that’s about as good as it gets at any level of product. Upgraded 5-axis system compared to the E-M5′s unit; similarly upgraded robustness and build quality – the entire camera is now magnesium alloy, instead of just the front and top plate. It’s supposedly more water- and dust-proof, in addition to being freeze-proof down to -10C. You’ll also have noticed the new inbuilt grip, which houses the wifi antenna – the camera acquires the remote abilities of the E-P5 (reviewed here) with extended control capabilities. We have a good old-fashioned PC sync port for use with studio strobes, too.

*I am very against leaks and rumours but I mixed up timezones for auto posting this morning (I’m on a location shoot all day) and accidentally posted an hour early. Mea culpa, and my apologies to Olympus and the other media – this was most certainly NOT intentional.

_5028005 copy
I had to test it. You know, waving a red flag at a bull and all that – 10 minutes under a hot shower while powered on, sitting in about 1cm of standing water. All whilst intermittently shooting a frame or two, and no ill effects whatsoever afterwards. Impressive, to say the least.

IMG_2702b copyIMG_2703b copy
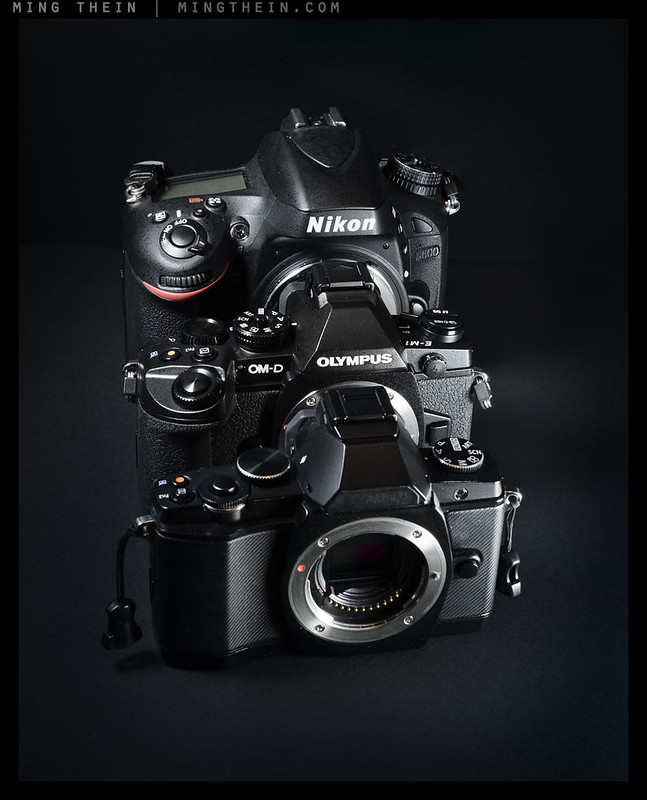
Body-in-white – all magnesium front/back/bottom, compared to just the top and front of the E-M5.

The EVF has been significantly upgraded too; it now uses the same panel from the excellent VF-4, which has near-double the resolution of the E-M5 (2.4m dots vs 1.4m) with dynamic brightness adjustment and much higher magnification. The tilting touch-sensitive LCD remains, but is now in a slightly thicker (and presumably more robust) housing than the E-M5. There’s also one neat electronic feature that stuck with me: the slightly confusingly-named color creator tool. On top of that, we have a new video algorithm with higher bitrate – 24mbps vs 18mbps – though still unfortunately 30p/60i not 25p/50i, and a standard 3.5mm mic-in port. On top of all of this, there are even more customisation options and extra function buttons than before.

_ET30101b copy

Let’s start with the important stuff: we now have phase detection AF capability on the sensor. In real terms, this means both much faster subject acquisition and the ability to track moving objects; in practice, the difference is quite noticeable. The camera is much more positive with acquiring and locking on to moving subjects, and the little ‘CDAF-jitter’ where the lens racks back and forth on the target to adjust for small changes in subject distance is mostly gone. There is a catch, though – the phase detect photosites don’t occupy the entire imaging sensor; instead they’re a diamond-shaped array of 37 points that cover a good portion of it; comparable to the best of the DX cameras, and much better than the full-frame ones. I’m told that the layout of the PDAF photosites was designed to minimize imaging data loss; instead of losing an entire line or or alternate pixel to AF, we have a diagonal grid array somewhat reminiscent of the Fuji SuperCCD which replaces a alternate green pixel on every alternate row. This allows the imaging data from that pixel to be interpolated from quite a number of neighbours. In practice, there is almost no noticeable degradation – you have to be shooting subjects with very high frequency detail at optimal resolving power to even suspect that something might be amiss.

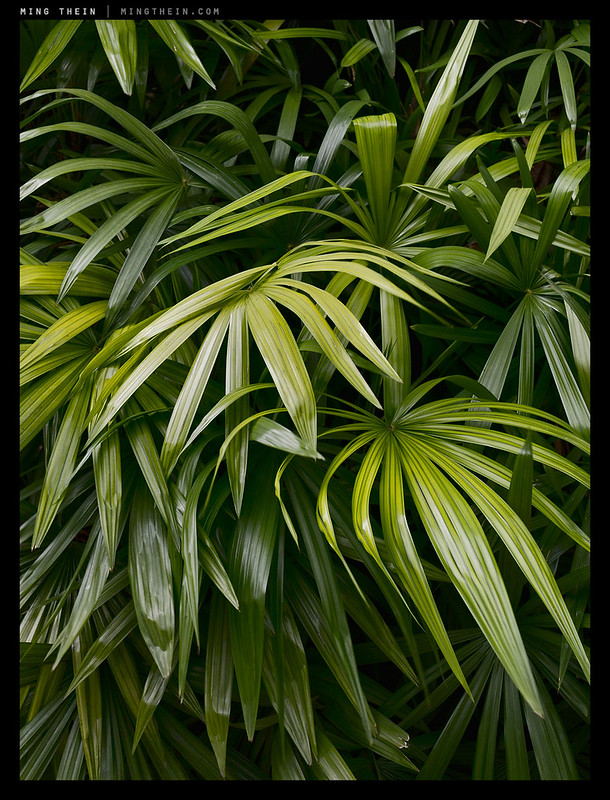
**If you’re wondering about the lack of action photos in this review, it’s because the weather has been pretty bad during the testing period – I tracked some unexciting motorcycles and cars, but didn’t produce anything of visual interest whatsoever. In any case, given the popularity of the trees photoessay, I felt that perhaps a different subject to the usual urban/ street documentary might be welcome for this review; no doubt you’ll be seeing plenty of this style of image from me in future.

_ET30292b copy

With dedicated M4/3 lenses, the system still uses CDAF most of the time; it’s not until things start moving and you switch over to C-AF that the PDAF system takes over. It also appears that the camera now gets flummoxed far less by very bright point sources (blown = no contrast = no focus) – situations that left the E-M5 hunting will result in a jitter but eventual lock on the E-M1; presumably it’s switching over the the PDAF system here. It’s worth noting that the camera obviously tracks much better if your subjects stay within the PDAF area; outside that, behaviour reverts to conventional CDAF – which is to say, not very useful for continuously moving targets. (That said, it’s still better than a DSLR – once you exit the AF grid, you have no AF ability whatsoever.) However, with legacy 4/3 glass, the camera is always in PDAF mode; you can tell based on which AF grid option you’ve got displayed – the brackets or diamond shape is PDAF.

_ET30177b copy

There’s also the ability to add AF fine tune compensation for individual lenses, too. I had the opportunity to try an E-5 (itself no slouch at AF speeds) side by side against the E-M5 with the same lenses: I don’t see any difference in focusing speeds or ability to jump quickly and decisively to different subject distances. This is a huge bonus for legacy 4/3 system users: all your glass is now usable at normal speed again, and the new body is both more capable and smaller than the outgoing one. For M4/3 users, there may not be quite so much excitement about use of 4/3 lenses – until you start looking for high grade special purpose glass like the 50-200 SWD, 150/2, or the 90-250/2.8…

_ET30316b copy

Bottom line: “are we there yet” for mirrorless AF? I’d say nearly. C-AF isn’t as positive or snappy as the current generation (say D3/D4) but it’s certainly usable with care; about on par with the D200 generation, I’d say. We need one more round of iteration (or a judicious firmware update). The E-M5 was already at the cutting edge for single-AF speeds; the E-M1 is slightly faster there, and can now reliably track moving objects, too.

_ET30302b copy

Let’s talk about ergonomics, haptics and the all-important build-feel. First, bad news: the camera has definitely gotten bigger. Wider by about 1cm or thereabouts; height remains the same. Depth obviously increases because of the grip. Adding the vertical portion of the battery grip increases size significantly; the grip itself is twice the height of the E-M5′s unit. There’s also a new one-piece vertical grip (HLD-7); it’s deeper and taller than the E-M5′s unit, making the whole combination a bit bigger, but the ergonomics better. Having found the most comfortable setup for the E-M5 to be with the grip extension piece only, changing batteries annoyed me because this had to be removed before accessing the compartment in the camera; fortunately we can now shoot the naked E-M1 and change batteries easily without having to do this. I don’t have a D7100 or GH3 handy to compare, but I’d say the size is not far off either of these cameras now (also gripped-up, of course). Ergonomics are excellent either way, but I’m personally lamenting the fact that the camera is not ‘really small’ anymore but just ‘small’ – those of you with bags that fit perfectly may need to rethink your packing solutions.

_ET30288b copy

The body is now all-magnesium instead of just top and front plates; it’s slightly heavier, but not by much. The increased surface area has made for some welcome changes to ergonomics though – there’s now space for additional buttons, as well as an increase in size of the old ones. We get a dedicated drive mode/ HDR/ bracketing and AF mode/ metering buttons; the same two-position switch to control dial and button function (both positions being customizable, of course) a-la E-P5; the much-maligned top plate play and Fn1 buttons are now relocated and much larger (though I personally liked having those buttons next to each other because it made for easy review-zoom); the mode dial locks, and the power switch has now moved to the top left corner. The exposure mode dial is now on the right, easily accessible with your right thumb and forefinger. It also has a locking button to prevent accidental rotation. What I don’t understand is the choice of ‘auto’, ‘photo story’, ‘art’ and ‘scene’ modes on the dial – this is billed as being a professional camera. Surely Olympus could put all of the hipstagram faff onto one position and given us a couple of quick-access customizable slots? A shame, if you ask me; time for the black marker…

_ET30084 copy
SOOC JPEG.

_ET30084b copy
My conversion from a color version; I’d say the camera’s native interpretation is pretty darn good.

There are two new shortcut buttons in front by the lens mount, too. It’s ergonomically better, but we can’t do single-hand power on-s anymore. In a final minor change, the control dials are angled and further apart – not that there was anything really wrong with the old ones. All in all though, I think the changes are positive: the camera really feels like a solid little brick in your hands, in a good way. This is a piece of equipment that says ‘professional use’- right down to the same spatter-finish magnesium paint as the single digit Nikons and Canons. The strap lugs are still unfortunately the D-ring type: whilst they don’t munch your hands like the OM-D and E-P5′s rings do, they transmit unnecessary amounts of noise to the body when recording video; I’d still prefer to have built in metal loops like the Canons.

_ET30230 copy
Another SOOC JPEG/ own conversion pair – bit more of a difference this time because I could selectively darken the green foliage…

_ET30226b copy

I’d always thought the EVF in the E-M5 was one of the better ones; until I used the VF-4 during the E-P5 review period. The E-M1′s EVF goes a step further: taking the same 2.4m dot panel, we now have dynamic brightness control which is supposed to render high contrast, bright and dark scenes with more natural-looking dynamic range. Whatever they’ve done, it seems to work. Whilst an EVF still cannot match a good optical finder on dynamic range, we’re getting ever closer with each iteration. On the colour, tonality and detail front – this is a notch above the previous model. And you can still adjust the color temperature of both EVF and LCD, which is a nice touch.

_ET30195 copy
SOOC or DIY conversion? If you’d guessed SOOC, you’d be right. I’m impressed.

_ET30193b copy
My conversion from color.

In a recent article on the future of the DSLR, one of the sticking points was viewfinder technology: I think those arguments are losing weight with every generation of EVF. The E-M1′s panel is now about the same size and magnification as the D800E; something impossible to do with a smaller sensor size simply because of the laws of physics – you’d land up sacrificing brightness or size since you have to make a smaller image area larger. On top of that, we of course have the ability to a) see actual depth of field* all the time, b) have dynamic information overlays, c) judge exposure and d) judge color. There’s a new tool called the Color Creator which takes advantage of this: effectively, it’s a live dynamic white balance and saturation shift; in conjunction with the live tone adjustments – effectively curves – you have an enormous and instantly visible ability to alter color balance to taste on the fly, just using the front and rear dials. It also allows you to apply color filter effects to B&W conversions – e.g. darkening blue skies with a red filter – by reducing saturation to zero and shifting the hue. In fact, with the quality of the new jpeg engine, it’s even one less reason to shoot RAW for most people.

_5028010 copy
Screenshot of the color creator; normally there’s a live preview of the effects on the image underneath with the wheel overlaid on top, but it’s easier to see on a black background in a still. This overlay can be programmed onto any one of the OM-D’s many, many shortcut keys.

_ET30260b copy

*No SLR viewfinder shows actual depth of field; most of the time you’ll preview at around f4, or perhaps f2-2.8 if you’re using a dedicated manual-focus camera. Try it if you don’t believe me: notice how brightness of the finder and what’s in focus does not change much between f1.4 and f2.8 when using DOF preview. Sadly, focusing snap/ precision with fast lenses has been long sacrificed for brightness since the era of slow consumer zooms. There are few really good viewfinders out there now; even the ‘pro grade’ cameras are nowhere near as good as those of the film era.

_ET30309b copy

One of the key strengths of the E-M5 was its stabilizer – those of you who’ve been reading the site for some time will recall that I was not a big fan of the earlier incarnations in the E-PM1, E-PM2 and E-PL5; those were prone to creating a double image under certain conditions. The E-M5′s 5-axis stabilizer is the only one I think is good enough to match and even surpass lens-based IS systems. The E-M1 is equipped with an upgraded version of this, supposedly good for an additional stop – Olympus internally claims 5 stops vs 4 stops, most of the gains being visible at slower shutter speeds. I found in practice that the E-M1 was a bit better, but it’s tricky to quantify exactly how much better. Suffice to say that I think it’s still the best a) handheld video platform and b) manual focus platform for this reason. (Caveat: I have not used the GX7 and its sensor-stabilizer yet.) It’s therefore a shame that the auto-ISO implementation picks a rather high shutter speed by default – and you have no way of overriding this and setting your own minimum (multiples of 1/FL equivalent would be ideal); this means you land up using a higher ISO than you might otherwise be able to get away with, using the full capabilities of the stabilizer.

_ET30077b copy
SOOC JPEG – beautifully rich, accurate color.

The shutter unit itself is different: it’s based off the E-P5′s design, now reaches 10fps, has a higher 1/8000s maximum mechanical speed, and unfortunately isn’t as quiet as the E-M5 – the pitch seems to be a bit higher (it’s a ‘click!’ rather than a ‘thut’) probably because the blades have to move quite a bit faster to hit 1/8000s. That said, though overall volume/ vibration levels are about the same.

I’ve been shooting more and more video of late, both in conjunction with the workshop videos and creative direction work for clients; I’ll usually operate the second camera for pickups, run and gun etc. The E-M5 has been my choice for its stabiliser; I know of at least one local production house that’s seriously evaluating these cameras to add to their arsenal. The E-M1 is even better because we now have a dedicated MIC-IN port, higher data rate (24mbps vs 18mbps) and a new algorithm that reduces block noise in areas of gentle gradients/ solid colors, like skies. Unfortunately, we cannot choose frame rates: it’s 1080 30p/60i only; 1080p50 would be nice. Now for some good news: rolling shutter artefacts are almost entirely absent, and even though it shoots 30p/60i, we don’t have any nasty artefacts from artificial light sources – the flicker reduction system is quite effective.

12-40 comparison corner CA flare
Note complete lack of CA. 100% crops are here.

Olympus has implemented a new processing engine in the E-M1 called TruePicVII. Whatever the name, the processor does a few important things: corrects for CA and lens distortion based on profiles generated for individual lenses (unfortunately only Olympus 4/3 and M4/3 lenses at the moment, much like how Panasonic only offers in-body correction for its own lenses) and dynamic sharpening depending on lens’ resolving power to avoid oversharpening haloes. For the most part, it works; though there were a few instances with certain lenses where there was a bit too much CA for the system to remove. The processing algorithms apply only to JPEGs, though they can be retroactively applied to the RAW files too if you choose to use the Olympus raw converter. Sadly, I still firmly believe that none of the camera makers’ software can match the flexibility of the Photoshop suite; they should really just focus on building cameras and leave software to somebody else. Though the new imaging engine only works on SOOC JPEGs, though the effect is really quite noticeable – between this processor and the other hardware improvements on the sensor, images just have a bit more ‘bite’ than the E-M5 – which we shall see in part two tomorrow.

E-M1 JPG ISO series
ISO series – SOOC JPEG, NR off. 100% crops are here.

Good news: this camera produces the best SOOC JPEGs I’ve ever seen; the output is very similar to the E-P5 (which you’ll recall I was very impressed with), but with the added flexibility of the color creator to shift WB and saturation (or apply virtual filters to your B&Ws). Sharpening is sensitive and not overdone; detail is crisp and the microcontrast characteristics of the lens are preserved well. The sensor’s overall tonal response seem quite similar to the E-M5; however there’s about a stop more dynamic range in the shadows, and noise seems better controlled – somewhere between half a stop to a stop. I’d say ISO 3200 still delivers good quality, and ISO 6400 is usable – this with JPEG noise reduction off. More importantly though, there’s little chroma noise and almost no odd hue shifts in the shadows at higher sensitivities caused by amplifying different color channels unequally. Color has always been Olympus’ strong trait; no exception here. Auto white balance is better than ever; it seems to have a slightly wider operating range specifically lower down in the Kelvin scale, making it able to better accommodate incandescent sources. The majority of the JPEGs in this review are straight out of camera; there are a few examples where I’ve processed a color file to compare against a SOOC B&W, and I think you’ll probably agree that the results are actually surprisingly close.

_ET30089b copy
ISO 6400 SOOC JPEG. A good amount of the red channel info is retained, and there’s remarkably little chroma noise or odd hue shifts.

Bad news, though: given that I was unable to run the raw files through my preferred ACR workflow (there’s obviously no ACR support at the moment), this portion on image quality is therefore based of JPEG output and is preliminary – I will update this later as soon as Adobe releases an update for the E-M1. Honestly, given what this camera can do in JPEG mode, I’m very much looking forward to seeing just how much latitude lies in the raw files. Bottom line: sensor technology has evolved significantly; the previous generation of 16MP cameras had more than enough image quality for most uses; any improvements on that are of course welcome, but are not game changing.

_ET30123b copy

A quick note on battery life: the E-M1 uses the same batteries as the E-M5 (good news, you won’t have to buy new spares). I averaged about 500 frames per charge, which is about 20-25% less than the E-M5, though it’s worth noting that I was always using a mix of 4/3 and M4/3 glass; I suspect the 4/3 glass is significantly more power hungry as there are larger motors moving heavier elements around. You’d probably get better battery life using native M4/3 glass exclusively – I’ve recorded up to 2,300 images on one battery (!) with the E-M5 in the past – shooting normally, long exposures, a decent amount of chimping etc.

_ET30059b copy

On the subject of use with legacy 4/3 lenses: I get the impression that the camera was developed with these users in mind; it’s been a long, long time since the last proper update to the proper 4/3rds line (I’ve been assured this isn’t dead, and an E-7 is in the works – update: my misunderstanding of the material presented. There was an E-7 design study, which may or may not happen.). The camera itself is physically a bit larger; larger than it needs to be to fit all of the (enlarged) buttons in, but at the same time quite similar in size to the earlier E-420 and E-520 cameras. The obvious question of whether legacy glass makes sense: for existing 4/3 system owners looking for an upgrade, there’s no question that the E-M1 is quite a few notches ahead of the E-5. For M4/3 owners, there are certain special purpose lenses that are available for 4/3 (and M4/3 with the adaptor) that might be of interest – specifically the pro telephotos – 55-200/2.8-3.5 SWD, the 150/2, the 90-250/2.8 and 300/2.8 – that aren’t available for M4/3. Performance of these lenses remains excellent on M4/3; this review was shot with a mixture of native M4/3 and 4/3 glass. Using the normal range zooms with an adaptor doesn’t make a lot of sense – native mount options are available and physically smaller.

_ET30047b copy

Time to wrap up. The OM-D has matured. It’s no longer a ‘cute’ but serious camera; it’s now matured and grown into a even more of a workhorse. It’s no longer small; in fact, it’s similarly sized to my F2 Titan (which is of course full frame). The upshot is that the camera balances much better with the larger 4/3 lenses, especially with the vertical grip attached; but it’s also ergonomically a bit more comfortable especially for people with larger hands – a kind of Goldilocks. This is a complex camera; one that will take time to master and even just to work out the optimum configuration for – and I plan to post an update in due course after a bit of time shooting with it properly, and once ACR supports its raw files.

One note on price – at $1399 for the body, it’s a lot higher than the E-M5 was, dangerously into high-end APSC territory. No question: I think it’ll be the biggest stumbling block to this camera’s success. The inclusion of amateur modes on the mode dial makes me question the target audience somewhat – I think the camera should have been a no-compromises tool either way, and for the most part, they’ve succeeded. Price is one of the things I hit the GH3 for; it had pro aspirations and pro pricing, but fell a bit short in several areas like size and viewfinder quality – though it makes for an very good specialized video tool. As we’ll see tomorrow in part two, there’s no real direct competition – it’s tough to figure out what the relative value/ pricing should be. At least a bit of the grip you had to previously buy with the E-M5 is now included…

_ET30074b copy

If you’ve come away from this review thinking I’m feeling pretty positive, that’s because I am; aside from the inclusion of PDAF on sensor, the other upgrades are evolutionary (but welcome) rather than revolutionary. In many ways, the E-M1 feels like the next logical step in the evolution of the camera: we are now seeing the best of DSLR (PDAF, ergonomics, comprehensive system) and mirrorless (CDAF, excellent and realistic EVF previews, 5-axis stabiliser, smaller physical size) finally coming together into one package. Perhaps the whole review is best summed up as this: you’ll know that I simply don’t have the time to review things that aren’t interesting or relevant for my personal or commercial work; however, on the basis of my evaluation over the last week, I’ve ordered a pair of E-M1s – one for set up for stills, and one for video work. MT

The Olympus OM-D E-M1 is available for preorder here from B&H and Amazon.
The Olympus 12-40/2.8 PRO is available for preorder here from B&H and Amazon.

Finally, a big thank you to Olympus Malaysia for the loan and advance preview of the camera. They are also running a touch and try launch event for users on 21/22 September – I will be in Europe unfortunately – but you can register here. The camera itself is available for preorder directly here; I’m told that worldwide public availability is set for end of October.

_____________________________

Enter the 2013 Maybank Photo Awards here – there’s US$35,000 worth of prizes up for grabs, it’s open to all ASEAN residents, and I’m the head judge! Entries close 31 October 2013.

____________

Visit the Teaching Store to up your photographic game – including workshop and Photoshop Workflow videos and the customized Email School of Photography; or go mobile with the Photography Compendium for iPad. You can also get your gear from B&H and Amazon. Prices are the same as normal, however a small portion of your purchase value is referred back to me. Thanks!

Don’t forget to like us on Facebook and join the reader Flickr group!

appstorebadge

Images and content copyright Ming Thein | mingthein.com 2012 onwards. All rights reserved


Filed under: Gearhead: Reviews

The 2013 Olympus OM-D E-M1 review, part two: some comparisons

$
0
0

_8038929 copy

In part one yesterday, I looked at the camera as a standalone device with few references to its predecessor or competition; today we’re going to examine some of the technical differences in a bit more detail against two benchmarks: the outgoing OM-D E-M5, and the Nikon D600. Both are 2012 cameras, and cameras that I’m intimately familiar with because I use them heavily in the course of my normal work – the E-M5 as my travel/teaching camera, and the D600 for video and backup to the D800E. The former is a no-brainer; the latter is perhaps a bit more of a stretch: not only is there a significant price difference, but the sensor goes up in size by two whole notches – it’s effectively four times the size of that in the E-M1. Surely this is an unfair fight?

Update: ISO comparison chart mislabelling fixed, and I am checking on the 12 vs 14bit issue.

_8038932 copy

_8038935 copy
E-M1 against older brother E-M5 with grip extension and full vertical grip; the E-M1 seems larger but is in fact just slightly wider, taller with its vertical grip, and actually shorter if you compare it to the E-M5 with the grip extension piece only.

Here’s my rationale behind the comparison: we want to know if the new camera is better than the old one – it is – and more importantly, by how much. But at the same time, the E-M1 really has no direct competition at the moment: the only other camera that comes close spec-wise is the GH3, and that doesn’t have the same level of build quality, PDAF, frame rate, or EVF quality; it’s really built with a different purpose in mind, too. Bottom line: there are no real pro-grade* DX or compact system cameras out there at the moment; the E-M1 is pretty much it. However, that brings us to the relative price point: in Malaysia, street price of an E-M5 body is about RM2,800; the E-M1 is ~RM4,500; the Nikon D7100 RM3,900; the Canon 7D RM4,000, and the Nikon D600 RM5,500. The Canon 6D is a bit more at RM5,900. I don’t have a D7100 or 7D handy; in any case, I don’t think they’re quite the same level of camera – the E-M1 trades a little resolution for a higher frame rate, significantly larger buffer, and much better build quality. In fact, the on-paper spec is much closer to the flagship D4 or 1Dx (16MP, 10fps, 51 shot RAW buffer, full environmental sealing) than the D7100. Bottom line: if you’re going to spend this much on a camera and you’re not committed to a system, you are probably going to be considering most of these options; especially when another RM1,000 (US$300) gets you full frame, and the D600 is the lightest and smallest there is at the moment.

*Built without compromises, or to protect a product higher up in the manufacturer’s line.

Before we get into raw performance, let’s talk a bit about use in the field and system completeness. The Nikon and Canon full frame lens lineups are undoubtedly mature; there is pretty much a lens for everything, including special purpose optics like supertelephotos, tilt-shifts and macros that exceed 1:1 reproduction ratio. There are also several grades of lenses to suit all budgets and durability levels. M4/3 has the most choices out of all of the mirrorless systems, but we’re lacking the tilt shifts, the pro telephotos, and the weather sealed high grade primes – surprisingly, lenses like the 12/2 and 75/1.8 are not sealed, (though I’ve had no problems with operating them in harsh environments). Flash solutions are a wash for both systems; there are wireless TTL/ commander options and heads of different power outputs.

Mirrorless of course has an enormous size advantage; having undertaken plenty of reportage and travel photography with both, I can tell you that there’s absolutely no question or shade of doubt in my mind – if I have to carry it for any length of time, I’m going with M4/3. Image quality is already more than good enough for large prints – and that’s with the previous generation of sensor. The one final element missing from M4/3 was continuous autofocus capability – and we’ve seen that’s just been addressed by the integration of phase detection photosites on the new sensor. So does there remain any solid reason to pick an APS-C or FF DSLR other than absolute resolution or extreme low-light? I opened a can of worms with an earlier article on the demise of the DSLR; now I’m going to pour that can out onto the table and spread it around a bit.

E-M1-Comparison-spec sheet

Here’s how the core feature table looks; I’ve thrown in the D4 for comparison, because I think this is the E-M1′s natural full-frame competition: a tough-as-nails, pro-grade, speed-focused general purpose photographic bludgeon. Green is a decisive win, red is a decisive loss. There’s one thing missing here – that’s the E-M1 and E-M5′s stabilizers, which is a definite advantage. You’ll note that the E-M1 actually seems to have the best balance of compromises, unless you’re a videographer – in which case the Canon (or the GH3) would be a better choice. In fact, what stands out is that the older E-M5 loses on a lot of the categories – yet that was reflected in no real disadvantage in its ability to make great images. More, is of course better. This is of course not a complete spec sheet, but I think it goes to show how difficult a comparison we have on paper. The price is undoubtedly steep – and that’s something I criticised the GH3 for, given that the camera was still lacking PDAF and had a subpar viewfinder even compared to the E-M5; the E-M1 pushes the boundaries higher still. It’s a shame, because I think Olympus must be torn: price it like the tool it is, or go for volume because a lot of consumers are still motivated by size?

I don’t think there’s any doubt that if the core sensor technology is of similar vintage, then the larger sensor will be better on all technical measures; the more pertinent question is just how much better, and more importantly, how far up do you have to climb the diminishing returns tree to see the difference? And that’s what I’m going to try to answer today.

Important testing notes: we do not yet have ACR support for the E-M1, and I’m not familiar enough with the Olympus software to be confident of extracting the most out of the raw files, so testing will be done with JPEGs – I’ll update this portion as soon as an update is released. For all cameras, sharpening will be set to the optimum for the camera – generally about halfway between default neutral and maximum; saturation was reduced slightly, contrast was set to minimum and noise reduction off; basically, I tried to create as good a starting point as possible for processing – in effect a ‘quasi-raw’ JPEG. I’ll use the 85/1.8 G on the Nikon, and the 45/1.8 on the Olympus cameras – stopped down to f8 on the Nikon, and f5.6 on the Olympus to balance off optimal sharpness, depth of field and diffraction. The cameras will be locked down on on a heavy Gitzo 5-series tripod and Arca-Swiss Cube geared head. You can click on any of the relevant links following the images below for 100% crops.

E-M1-Comparison-low ISO
Low ISO comparison – 200-1600 – click here for 100% crops.

Let’s talk about the easy stuff first – low ISO noise. I’d say the most obvious thing that’s apparent from the above swatches is that the D600 has more dynamic range than the M4/3 cameras; unsurprisingly, the ensuing images look flatter and lower contrast (lighting conditions and exposure times were identical for all three cameras). All three cameras are very clean to ISO 800, though it’s also clear that the E-M1 has the weakest (i.e. none) AA filter of the three; the D600′s AA filter is fairly strong – look at the dot pattern in the white CD case. The E-M5′s JPEG and NR engine is noticeably coarser than either the E-M1 or D600; there’s just a hint of splodginess creeping in at ISO 1600. Still, I wouldn’t hesitate to use any of these cameras at any of these settings.

E-M1-Comparison-high ISO
High ISO comparison – 3200-25600 – click here for 100% crops.

Higher ISOs are a different story – the E-M5 is looking very ropy by ISO 6400; I try not to exceed 3200 on this camera. The D600 is still pretty smooth and retaining fine detail well (look at the logo in the black CD case) though color is starting to get very flat and chroma noise is dominating the shadows past ISO 6400. This is actually a little surprising as Nikon’s forte has always been keeping noise in the luminance channel. I wouldn’t use this camera past 6400. The E-M1 is actually keeping pace with the D600, and trades chroma noise for a bit more luminance noise; there’s not a lot of difference in resolution to ISO 6400, but above that the D600 pulls away. On an absolute basis, I think the E-M1 has pulled out a stop from the E-M5 – I’d use this camera at 6400, but no higher. What’s really impressive about the E-M1 is that there are no odd colour/hue shifts going on as the sensitivity increases – look at the red swatch, for instance. (Actual color in real life is somewhere between the D600 and E-M1; neither camera gets it right.)

E-M1-Comparison-hat

In this scene, we look at dynamic range. Each camera was exposed until the any of the individual channel highlights just clipped; I used the live highlight warning on the M4/3 cameras, and the playback highlights on the D600. It appears that the E-M1 has a slightly brighter highlight rendition than the E-M5 – the same amount of clipping was visible in both at these settings. I suspect it might have something to do with the color rendering: even though all cameras were manually set to the same Kelvin WB, the E-M1 has the most accurate color of the three; the E-M5 is too yellow, and the D600 is too green. On the E-M1, the histograms for each individual color channel are much closer together – resulting in slightly brighter highlights.

E-M1-Comparison-hat-highlight
Highlights. 100% crops here.

E-M1-Comparison-hat-shadow
Shadows. 100% crops here.

No question that the D600 has the most dynamic range of the three; that’s to be expected given that it has the larger pixel pitch by some margin. I’d call it half a stop in the highlights and perhaps a stop in the shadows; I suspect it would be a lot closer in RAW however – the E-M1 seems to have very clean shadows, potentially hiding quite a bit of usable latitude. The E-M5 noticeably trails both cameras again – look at the folded cloth, and the hat band. Out of the three, I prefer the E-M1′s rendition of the scene; I think it’s the mixture of getting the color almost spot on, as well as the added punch from the lack of AA filter; though the two M4/3 cameras are quite similar here, note the softness in the D600 image – even at the point of focus (look at the hat).

_ET30476 copy

Next up is a grab from out of the studio window; we will consider real world resolution and dynamic range.

E-M1-Comparison-car highlights
Highlight rolloff – click here for 100% crops.

E-M1-Comparison-car detail
Practical resolution – click here for 100% crops.

Once again, the D600 seems to have the flatter image – shadows aren’t quite as dense as the E-M1, but we really need to see RAW files to figure out how much of this is the in-camera processing and how much of it is the sensor’s native response. What I do notice though is the highlight rolloff of the E-M1 seems to be the best of the three, though it shares the densest shadows with the E-M5; the E-M5′s highlights are a bit dull, and the D600 seems to clip abruptly. Differences in native tonal response? Probably. Though the two M4/3 cameras are pretty close on resolution, I’d give the E-M1 a hair in acuity and microcontrast; it must be a mix of the lack of AA filter and new image processing engine; fine detail just doens’t seem as coarse as the E-M5. The D600 is clearly resolving a little bit more than the other two – look at all of the number plates – but it’s really surprisingly quite close. If the D600 also lacked an AA filter, the difference would be much larger.

Here’s the practical challenge, though: all of these tests were conducted under optimal shooting conditions: heavy tripod, magnified live view to confirm critical focus, base ISO. In the real world, you’re not going to be able to achieve that all of the time under the shooting conditions for which these cameras were intended – handheld travel or reportage-style work – which means that you might well not be able to get the same results. I find that the current crop of 24 and 36MP cameras give up a stop or two in shooting envelope – you have to have a much higher shutter speed to ensure critical sharpness, which effectively degrades both low light capabilities and dynamic range. The OM-D twins, however, have that excellent stabilizer that allows you to stick to the 1/focal length rule or below; effectively buying you a couple of stops. Unless you’re shooting action, where shutter speed is critical to freeze motion, this makes a huge difference in practice! If we couple that with the increase in size of the larger sensored system – for both camera and lenses – then the advantage of the mirrorless contingent becomes even larger.

With PDAF on sensor, that last bastion of the DSLR is eroding, too. Practically, the D600′s AF system still tracks better than the E-M1; I spent some time shooting traffic and found that the E-M1 would perform similar to or slightly better than the D200 generation of cameras in terms of tracking ability; I think with another iteration or judicious firmware update, the gap will, shrink even further. Mirrorless will always outdo an SLR in AF accuracy; simply because the exact focus point is also the exact imaging point.

And here we come full circle: I compare the E-M1 to the D600 because it’s the cheapest entry into full frame (and I didn’t have access to a pro DX camera; in any case, none of the current lineup match it on spec either) – and whilst the D600 still holds a bit of an advantage in image quality, it’s not as much as you might think; less in practical application; far more of the difference will come down to shot discipline and how the images are processed. And that’s assuming pixels are going to be peeped: they’re close enough that even at 100% it takes a reasonably trained eye to spot the difference. Everybody will see the composition first, of course. Even if we’d had DX cameras in the mix, the results would be even closer still – if not an even match. Even as it stands, I haven’t observed that much difference in underlying sensor quality between the GR and OM-D; at stop, at most. Most of the difference is due to the optics. Yet despite its sensor, the D600 lags behind in every other specification; it’s not until you hit the full-fat D4 that you can match frame rates or environmental sealing. Bottom line: there is simply nothing quite like the E-M1 at the moment – a very compact professional system camera.

The Olympus OM-D E-M1 is available for preorder here from B&H and Amazon.
The Olympus 12-40/2.8 PRO is available for preorder here from B&H and Amazon.
The E-M5 is available here from B&H and Amazon.
The D600 is available here from B&H and Amazon.

_____________________________

Enter the 2013 Maybank Photo Awards here – there’s US$35,000 worth of prizes up for grabs, it’s open to all ASEAN residents, and I’m the head judge! Entries close 31 October 2013.

____________

Visit the Teaching Store to up your photographic game – including workshop and Photoshop Workflow videos and the customized Email School of Photography; or go mobile with the Photography Compendium for iPad. You can also get your gear from B&H and Amazon. Prices are the same as normal, however a small portion of your purchase value is referred back to me. Thanks!

Don’t forget to like us on Facebook and join the reader Flickr group!

appstorebadge

Images and content copyright Ming Thein | mingthein.com 2012 onwards. All rights reserved


Filed under: Gearhead: Reviews

Lens review: The Olympus 12-40/2.8 M.Zuiko PRO

$
0
0

_8038915 copy

Announced and available together with the new OM-D E-M1 (reviewed here), the 12-40/2.8 M.Zuiko Digital PRO (24-80mm equivalent) is the first in a new line of M.Zuiko Digital PRO lenses. Development of an equivalent-grade f2.8 fast telephoto zoom was also announced, with a 2014 release. Thanks to the folks at Olympus Malaysia, I’ve had the opportunity to use this lens together with the new camera for some time now. Read on for my review.

Advanced warning: Flickr will apparently be down for maintenance for a little while on Friday 13/9, so if some images don’t appear, it’s because they’re hosted there…

_ET30316b copy
Not a crop.

The 12-40 is billed as being at the top end of the lens lineup. Unlike the previous high grade primes (12/2, 17/1.8, 75/1.8, click on the links for my reviews), the 12-40 is ‘triple proof’ – fully environmentally sealed to match the E-M1, and dust-, splash- and freeze-proof. It has a very nicely made machined aluminium barrel and zoom/ focusing rings, all of which are textured and grippy for use with gloves; overall finishing quality is on par with the primes; unfortunately all of this metal and robustness comes at a price – 382g of weight and bulk (70x84mm, 62mm filter). The lens is larger and heavier than the Panasonic 12-35/2.8, and slightly larger than the 75/1.8 (without hood). The lens also adds a programmable L-FN button for use with your thumb when cradling the combination with your left hand. At the asking price – I’m told in the region of US$1,000 – Olympus have finally included a hood and center-pinch lens cap; both of which are high quality items. The hood is reversible for storage, has a bayonet lock and metal rim; the lens cap appears to be mostly metal and rather nice looking, though I suspect also easily dented.

_ET30129b copy

Accessories aside, the most useful feature that’s made the transition from the primes to this zoom is the manual focus clutch – like the 12 and 17mm lenses, pull backwards on the manual focus ring, and you get both a distance scale and hard stops at either end. This is great for a few things: firstly, taking control of the camera; secondly, pulling focus for video, and finally, if you’re good at estimating distances and depth of field scales, run-and-gun hyperfocal street photography. It’s actually the second item that has me interested. Now that I’m shooting more video, focus pulling becomes an issue; it’s tough with fly-by-wire lenses that lack feel and hard end stops; it’s harder when the speed of the focus pull is oddly proportional to the speed at which you turn the ring, but not the displacement of the ring. The 12-40 (and 12, and 17 lenses) has a neat trick: if you put the ring in the MF position, set your distance, then push it back to AF and focus, it remembers the MF position. This means you can pull focus instantly between any two distances simply by pulling the ring backwards! Better still, the distance is held regardless of the zoom setting. Neat, and very useful in practice. Needless to say, both zoom and focus rings are well damped and have the right amount of resistance for precise setting, but the focus ring is especially commendable.

_ET30434b copy

Autofocus speed is the same as the other recent MSC lenses in the Olympus M4/3 lineup: very, very fast and completely silent. The lens performs pretty well in C-AF mode together with the new PDAF sensor, too. No complaints here at all. What is noteworthy though is that larger physical size of the lens has enabled the designers to include more helicoid; the upshot of which is that the lens focuses down to 20cm from the sensor plane at all focal lengths: in reality, this means about 4cm of working distance from the front element at telephoto, and ~5.5cm at wide. Maximum frame coverage is 48x36mm, meaning slightly better than 1:3 magnification. You’d need a dedicated macro lens on full frame to achieve this. Better still, as we’ll see later, there’s no compromise in optical quality even at this distance.

12-40 MTF
Optical formula and MTF chart compared to the 12-60/2.8-4 for Four Thirds, courtesy Olympus Malaysia.

The lens has a rather exotic optical formula – 14/9 construction but with one aspherical ED element, two regular aspherical elements, one DSA element, two normal ED elements, one HD element and two HR elements – there’s virtually no ‘normal’ glass in there at all. It also benefits from Olympus ZERO coating (previously seen on the 60/2.8 Macro), whose aim is to reduce flare and increase microcontrast. It works. I did encounter occasional flare in very high contrast situations – visible as a bit of ‘spillage’ around the edges – but the shadowed portions of the frame retained detail, contrast and saturation well. Color rendition was neutral to slightly warm, and richly saturated.

_ET30410b copy
Full test scene.

12-40 comparison corner CA flare
Corner crop from E-M1 SOOC JPEG, processed through new TruePic VII engine. 100% crops are here.

There’s some minor longitudinal CA on very high contrast subjects, but very little lateral CA in the plane of focus – the worst I saw was about half a pixel at 12mm and f2.8; an excellent performance indeed for any lens, let alone a zoom. You’ll notice in the JPEG sample posted from the E-M1 below that CA is completely absent, thanks to the camera’s new image processor. Regardless of which camera you use, distortion is very, very well controlled indeed – there’s none visible at the long end, and just a tiny hint of pincushion at wide – it actually fares better than many primes in this respect.

_5027994 copy
12mm test scene.

12-40 comparison 2 12 center
Center, 100% crops are here.

12-40 comparison 2 12 corner
Corner, 100% crops are here.

Sharpness and microcontrast (related properties) are excellent anywhere in the frame, at all apertures. This is a lens which does not appear to improve much when stopped down; partially because performance is already excellent wide open (it causes the E-M5 to display moire), partially because it seems that we hit diffraction at f5.6, and partially because we have some strange field curvature effects going on. At the 12mm end, center resolution improves by a hair on stopping down, but the edges actually degrade a fraction. The opposite happens at the 40mm end – the center gets a bit softer, but the edges improve. (I repeated this test a few times just to be sure; it could of course be down to my individual sample.) In either case, we’re nitpicking because the difference really isn’t that much; just decide how much depth of field you need and pick your aperture accordingly.

_5027996 copy
40mm test scene.

12-40 comparison 2 40 center
Center, 100% crops are here.

12-40 comparison 2 40 corner
Corner, 100% crops are here.

A quick note on close range performance: expectedly, the edges drop in resolution, but the center remains excellent – I was surprised at just how good this lens was as a makeshift macro tool. It obviously doesn’t have the same magnification, microcontrast/ resolution or working distance as the 60/2.8 – but then again it wasn’t optimized for use in this range to begin with. If you don’t plan to do very high magnification work, this may well be all the lens you need.

Note: Given that I was unable to run the E-M1′s raw files through ACR for the time being, optical testing was done with the E-M5 instead.

The lens has a 7-bladed diaphragm with curved edges; it forms a near-perfect circle at most settings, and delivers pleasingly smooth bokeh. The rendering style feels more like Olympus’ primes than what you’d expect of a zoom. And I certainly didn’t see any of the nervous double-imaged backgrounds frequently generated by the Panasonic 12-35, either – and believe me, I was looking for it. (The foliage I was shooting would be the first place this would show up). It separates your image nicely into planes, with a sharp transition between in focus and out of focus elements.

_ET30277b copy
Bokeh and close range performance are both exceptional. This is wide open at 40mm.

In a stroke, I think this lens becomes the defining do-it-all-and-anywhere for M4/3; yes, it’s a bit large, but the useful range, reasonably large aperture, solid build, outstanding optics, very close minimum focusing distance more than outweigh that. It’s not a cheap lens; but then again, I can’t think of any others with the same spec that are. Optically, this is one of the best zoom lenses I’ve ever used. It can replace a couple of primes in your kit quite easily; paired with the 75/1.8, I suspect this will make an outstandingly flexible travel combination. And yes, I’ve ordered one to go with my E-M1. MT

The Olympus OM-D E-M1 is available for preorder here from B&H and Amazon.
The Olympus 12-40/2.8 PRO is available for preorder here from B&H and Amazon.

_____________________________

Enter the 2013 Maybank Photo Awards here – there’s US$35,000 worth of prizes up for grabs, it’s open to all ASEAN residents, and I’m the head judge! Entries close 31 October 2013.

____________

Visit the Teaching Store to up your photographic game – including workshop and Photoshop Workflow videos and the customized Email School of Photography; or go mobile with the Photography Compendium for iPad. You can also get your gear from B&H and Amazon. Prices are the same as normal, however a small portion of your purchase value is referred back to me. Thanks!

Don’t forget to like us on Facebook and join the reader Flickr group!

appstorebadge

Images and content copyright Ming Thein | mingthein.com 2012 onwards. All rights reserved


Filed under: Gearhead: Reviews

Olympus OM-D E-M1 review updated with thoughts on RAW quality

$
0
0

_ET41526b copy

Now that ACR has preliminary support for E-M1 raw files – amongst a whole load of other cameras – in ACR 8.2 (available here for Mac and Windows), I’ve gone through and reprocessed a few to assess the RAW quality of the E-M1′s sensor; I expect to have more thoughts on this in the longer term after I have a chance to put the camera through a greater variety of scenarios. Sadly, my loaner went back yesterday, so further updates after this one will have to wait until my own cameras arrive in October.

The full updated review is here. MT


Filed under: Gearhead: Reviews

Book review: On This Earth, A Shadow Falls by Nick Brandt

$
0
0

_G000660 copy

Spoiler alert: my product photos in no way do this book justice. Not even close.

This article is going to be much less of a review than a gushing of praise; if you have a single photographic bone in your body, enjoy fine art printing, or photo books, or nature, or animals, or Africa, or any combination of the above – I think you’ll be blown away by this book. And at current discounts, it’s a steal for what you’re getting. I’d actually held off writing the review for some months simply because I wanted to a) have another chance to really study the images without the initial awe (it didn’t work, the awe is still there) and b) find a way to adequately express how they make me feel, as the audience.

Nick Brandt isn’t exactly your conventional career photographer; perhaps there isn’t such a thing anyway. He actually directed a number of award-winning music videos in the early 90s for Michael Jackson, Moby, Jewel and other acts. It was on one of these shoots – in Tanzania – that he fell in love with Africa and wanted to try to capture these feelings through photography, but in a unique style. It was the beginnings of a project that would continue over a decade and span three books. Beginning in 2000, Brandt photographed extensively around East Africa; five years later, the first book was born. On This Earth, A Shadow Falls is actually a combination of the first two books – the story has it that he was not happy with the original printing of the first book, which failed to capture the tonal nuance and subtlety of the images; in the end, finding a suitable printer took so long that the second book was complete, and so they merged.

_G000663 copy

Brandt eschews traditional ‘reality’ wildlife photography for a style that’s much closer to classical large format portraiture; his animal subjects take on intimate, emotional, very human qualities that are in some ways reminiscent of the thousand-yard stares captured by Dorothea Lange. All of his subjects are wild and of course unposed; it’s not at all easy to approach them sufficiently close to frame as he’s done without spooking them, or worse, being attacked. I can only take my hat off and bow to anybody who has the cojones to photograph a lion with a normal lens mounted on a camera that probably sounds like a rifle shot when it goes off…

The images are entirely shot in black and white with some toning, supposedly on a Pentax medium format camera; I’m a little dubious of this as there are clear tilt shift movements at work in some of the images, and to the best of my knowledge there are no lenses for the 67 system that would offer these movements in the perspectives seen. Judging from the luminosity of foliage and sky also suggests that a lot of the images were shot with a combination of filters and possibly also infrared film. Regardless of the medium and method, the pictorial results are stunning: they have the right degree of organic softness to convey emotion, yet at the same time, there’s a deep richness to the tones that makes both subject and image ageless.

_G000666 copy

Viewing the images, you feel as though you’re peering into another time and world; there are times where the intensity of gaze makes it feel as though you’re the one who’s being observed, not the other way around. This is especially true of the tighter portraits of single animals; I can only imagine it would be an incredibly emotional experience to view these in a large format exhibition. Perhaps this is what Brandt was aiming at: not so much the aesthetics, which are superb, but the experience and the emotion he felt while being there.

From this perspective, just about every single image in the book is a success – no mean feat considering there are literally hundreds. Admittedly some of them feel a bit formulaic towards the end – mostly those of large groups of animals – but there are some in there which are undoubtedly destined to be future classics – the dusty elephant, for example. In places, the overall tones and aesthetic felt very close to Salgado’s work, but with perhaps a greater, more reserved majesty; you get a very real feeling of the animals’ struggle to survive in such a harsh environment.

_G000664 copy

I’d like to spend a bit of time talking about the book itself – it’s a magnificent example of what a fine art photography book should be. It’s hardcover, bound in linen with an inset cover plate, and covered over again in a hard plastic for longevity. The paper inside is exquisite; I believe it’s a variety of coated baryta. Regardless of the technicalities, it feels very much as though that paper was specifically and very deliberately selected to suit the mood Brandt was after with the subjects and compositions – it succeeds admirably. I’ve never seen such a harmonious combination of paper, tones and content in any other subject. Normally, if you put your nose up close enough to any book, you’ll begin to see the individual dots laid down by the printing process; no such thing here. Even the very finest of text appears continuous and smooth; the overall result is something that somehow manages to reproduce the tonal feel of film almost as good as an optical wet process; or at least certainly far past the point of offset or giclee printing. ‘Refined’ is the best word to describe it. I believe the book was printed with the gravure process, but I’m no expert.

_G000662 copy

A special mention must be given to the sequencing and layout of the book: it’s clearly very deliberate and well thought out. The order of the images establishes a nice rhythm that encourages your eyes to look, sip, and appreciate slowly; it’s a bit like how a brandy balloon really precludes any drinking contests. Similarly, strong images that stand alone have their own double-page spread, even if the image is only printed on one side; this removes distractions and is commendable. There are of course double-page spreads, and these look magnificent simply because of the size of the book – easily 15″ tall or thereabouts. I don’t think I can stress enough just how much of a complete, polished package this book comes across as – you get the impression everything has been very deliberately chosen to help convey Brandt’s artistic vision to its fullest. There are no compromises here. I’m looking forward to the final instalment in the trilogy, due end of this year…MT

On This Earth, A Shadow Falls is available here from Amazon.

_____________________________

Enter the 2013 Maybank Photo Awards here – there’s US$35,000 worth of prizes up for grabs, it’s open to all ASEAN residents, and I’m the head judge! Entries close 31 October 2013.

____________

Visit the Teaching Store to up your photographic game – including workshop and Photoshop Workflow videos and the customized Email School of Photography; or go mobile with the Photography Compendium for iPad. You can also get your gear from B&H and Amazon. Prices are the same as normal, however a small portion of your purchase value is referred back to me. Thanks!

Don’t forget to like us on Facebook and join the reader Flickr group!

appstorebadge

Images and content copyright Ming Thein | mingthein.com 2012 onwards. All rights reserved


Filed under: Gearhead: Reviews

Quick thoughts on the Sony A7 and A7R

$
0
0


Image from B&H.

The internet is going to be full of anticipation, excitement, speculation and various forms of virtual hand-wringing over Sony’s latest announcement: full frame mirrorless. I’m sure some bloggers have already had a chance to use one, but given the local market entity’s attitude, don’t expect to see a review from me anytime soon (if at all). As interesting as it is, I simply won’t be able to get a camera. What I can do is put together a few initial thoughts. I don’t normally join the equipment frenzy, but I think this is significant enough that it warrants some serious consideration.

  • There are two versions: one with 24MP and PDAF on-chip (the A7) and one with 36MP, no AA filter and no PDAF (the A7R). It is supposedly not the exact same sensor as the D800E; this one apparently has offset microlenses to deal with the very short back flange distance.
  • Bodies are weather sealed; presumably lenses, too. To what degree remains to be seen – for instance, there’s a big difference between the D7100 and the D4, but Nikon claims both are ‘weather sealed’…
  • Yes, it’s slightly lighter than an E-M1, and about the same size – which significantly erodes the reason for going M4/3. However, the ergonomics look like a disaster – far too many sharp edges, not enough physical controls, and reading things like ‘same menu as the RX1′, I’m starting to cringe.
  • It is not clear to me how one is going to consistently make the most of the 36MP model; from experience with the D800E, some weight or IS system is actually required to have sufficient stability to consistently extract all of the resolution of the sensor. Bottom line: most users may not see as much of a difference as they think between the A7 and A7R.
  • Yet another new lens system: presumably Sony will make some G to A7 adaptors, but we’re back to buying new lenses again. There are 28-70/3.5-5.6, 24-70/4, 35/2.8, 55/1.8 and 70-200/4 lenses announced. Surely Sony can’t be meaning to support G, NEX and A7 lens lines in any meaningful way? That would seem like too much cost and business risk, to me.
  • Smaller than a FF DSLR, but it can’t be too small – even if the body is compact, it still has to be big enough to be ergonomically comfortable with the larger lenses required to cover the larger sensor. So the whole thing is…I suppose somewhere around NEX-sized in the end, at a minimum. Which means there’s still a meaningful size advantage to M4/3: find a weather sealed, 24-80/2.8 equivalent zoom that focuses to 20cm at all distances (forget DOF, we’re looking at FOV and light gathering capability) with stabilizer for the A7R, and I guarantee the lens alone will be heavier than the E-M1 and 12-40
  • Built-in EVF: good, and necessary for both focusing and stability (bracing the camera to your face).
  • Price: at $1699, the A7 is competitive, I think. The A7R is quite a bit more expensive at $2299; neither is cheap per se, especially given the lack of lens choices. I think for most people, the smarter buy would be the A7, with PDAF on-sensor and less demanding pixel pitch.
  • Lens prices: $3000 for the 70-200/4? What are they thinking? That’s Leica territory.
  • Don’t think you can get away with adaptors: the planarity of such adaptors is going to be absolutely critical, especially with such short flange distances and resolution numbers. You’ll actually be able to see the effects of a cheap, out-of-plane adaptor – it looks a little like a tilt. (I know this because I tried Hasselblad lenses on my D800E; none of the three adaptors I obtained had sufficiently tight tolerances to avoid this problem.)
  • Very subjective: Is it just me, or does it look a lot like an E-M5, but more square?

There are conflicting messages here. Sony obviously said: ‘let’s put all of the tech we can into the smallest possible package, to chase the highest possible image quality’ – which is fine as a goal in itself. However, the A7/A7R undermines the A99 – the smaller camera getting the better sensor (despite the 36MP unit being available for some time now) suggests that Sony may well be abandoning any serious further DSLR development. And where does this leave the recently-launched RX1R? Why would you buy a fixed lens option – granted, with a slightly faster lens – when you could have interchangeable instead? Then, we have the whole lens-vs-sensor problem: great sensor, limited and mostly unstabilized lenses. (Hint: look at Fuji’s initial lens choices for the X system; those said ‘we’re serious’. Sony is saying ‘we’re actually consumer; have two 2X-70 zooms and a couple of unexciting primes.’ It seems odd to be so ballsy on the camera side, but completely lack any stones with lenses). Then we have portability vs. usability: it’s small, but you’ll still need a tripod to extract ‘full value’ from the sensor, which means that we’re back to the overall system being big again. The lenses really need to be stabilized: all of them. Granted, this is also true with a D800E, but by the time you’ve added a decent tripod, the weight savings on the camera side pale somewhat.

Personally, even though it’s extremely unlikely I’ll ever buy one – I have pretty much all I need already – I really hope it succeeds: firstly, it really throws down the gauntlet to the other camera makers, hopefully forcing them to actually innovate (I’m looking at you, Nikon and Canon) to stay competitive. And if they innovate, Sony will be forced to actually look at UI for a change, and make something that works like a camera, not an electronic gadget. Secondly, it means that Sony/ Zeiss might actually develop some better lenses for it – yes, 35 and 55mm primes are nice, but some of us need a bit more than that in order to seriously consider the (re)investment required to justify this as a whole system.

Big, innovative changes like this are going to be necessary for survival; the further we move past the point of sufficiency, the less motivation buyers are going to have to open their wallets for incremental upgrades. It’s going to take a step change to motivate spending; step changes like this one. MT

Note: The RX10 was also announced at the same time; it has a 28-200/2.8 constant aperture zoom, the sensor from the RX100M2 and both EVF and top LCD status panel. Unfortunately, there is no free lunch: it’s enormous. But it does look like an interesting possible all-in-one, if the lens is up to snuff…

Update: I’ve been receiving a lot of heated comments and hate mail by people defending the cameras and accusing me of being negative and dismissive. Read the article again: I’ve said twice that the technology is impressive and I hope the camera succeeds. I’ve also said that it’s the local agent’s attitude I’m not enthusiastic about, and that precludes me ever trying or buying one. Furthermore, there are a lot of assumptions being made by most of the readers that are incorrect, or at best, flawed. Slapping an adapted lens on something does not guarantee great results; it’s highly variable. You will not know until you try that specific lens and that specific adaptor, Leica or not.

Finally, the photographer always makes far more difference to the final image than the gear. And a skilled one will be able to do more with the same equipment than an unskilled one, but better gear will not close the gap. What bothers me is the sheer number of people who think a new piece of gear is the messiah and will make amazing images just because of a spec sheet. Reality: buying new equipment will NOT change the way you shoot, especially if you care more about gear than photography. This site is about photography. I assess equipment only as a tool to achieve an end goal, nothing more.

Both A7 and A7R cameras and a variety of lenses are available to preorder here from B&H. The RX10 is here.

_____________________________

Enter the 2013 Maybank Photo Awards here – there’s US$35,000 worth of prizes up for grabs, it’s open to all ASEAN residents, and I’m the head judge! Entries close 31 October 2013.

____________

Visit the Teaching Store to up your photographic game – including workshop and Photoshop Workflow videos and the customized Email School of Photography; or go mobile with the Photography Compendium for iPad. You can also get your gear from B&H and Amazon. Prices are the same as normal, however a small portion of your purchase value is referred back to me. Thanks!

Don’t forget to like us on Facebook and join the reader Flickr group!

appstorebadge

Images and content copyright Ming Thein | mingthein.com 2012 onwards. All rights reserved


Filed under: Gearhead: Reviews

Preview: The 2013 Fujifilm X-E2

$
0
0

_5030421 copy

The Fujifilm X-E2 is a welcome update to last year’s popular X-E1. The camera takes the innards of the X100s and puts them in an X-mount body; it isn’t the X-Pro2 that a lot of users were hoping for, but it’s a significant enough update – for those who had issues with AF speed at least – to warrant serious consideration. In fact, I was sent a list of 61 improvements the X-E2 carries; some new to the camera, some inherited from the X-M1 and others from the X100s. I personally have had a rather inconsistent experience with Fujifilm products; on one hand, I absolutely love their films – Acros is my mainstay in all formats – but was left highly expectant and then disappointed by several cameras, first the original X100, then the X-Pro1, the XF1 and finally the X20. These are cameras I wanted to love, but found lacking in several areas; ultimately, I landed up with M4/3 as my compact system choice due to maturity of cameras and lenses. Many have asked why I don’t seriously consider the X system; I was offered a pre-production prototype by Fujifilm Malaysia, and I cleared a few days in the schedule to seriously revisit the system.

Note: the camera’s firmware is not final, so there will be no evaluation of image quality yet, or full size files or crops. Also bear in mind that some of the observations may change after final firmware. Most of the images in this review are mostly SOOC JPEG; a few have minor color corrections and all B&W images were converted from colour source files.There are also more samples in this Flickr set.

I also have the X-Q1 here; I just haven’t had time to shoot with it yet.

_5030423 copy

The biggest changes are around the sensor and focusing: the X-E2 uses the X100s’ 16MP X-Trans II CMOS which has phase detect AF photosites on chip. As we know, the X-Trans layout uses a different colour filter array and interpolation method to arrive at the final image, which supposedly increases image quality and prevents moire. I can agree with the latter, since I simply didn’t see any during the test period of this or any of the other X-Trans cameras I’ve shot; however, I’m still stymied by workflow issues when it comes to image quality comparisons: sadly, ACR results are mediocre at best. However, if I use another converter, lack of familiarity is going to prevent me from obtaining optimal results from any camera; beyond that, the whole workflow is significantly slower. Let’s park this issue for now and hope that Adobe eventually gets the demosaicing algorithm right – or that Fuji shares it with them. It would seem like an obvious business decision given the number of X-system users out there; I saw a surprising number in my recent European workshops.

_XE2_DSF9300b copy

Back to focusing. One of my biggest issues with the early cameras was focusing speed; it was downright slow and worse still, imprecise. Subsequent firmware updates have improved that, but not to the point that I was confident of the camera nailing the target in the same way the OM-D does; I’m pleased to say that the X-E2 fixes this. It still isn’t as fast as the E-M5 (let alone the E-M1); to be honest I think it sits on the borderline of being sufficient. There were a lot of situations in which the camera just felt laggy – mostly due to an initial hesitation before the lens kicked in; I am pretty sure this is down to the notchy shutter button – it feels like it has three positions, with the first detent after taking up initial slack (usually activating AF on other cameras) doing nothing. Despite shooting with it intensively for several days, it still felt slow to me. Odd, because this was not the case at all with my friend’s X100s.

_XE2_DSF9306b copy

There is a ‘high performance mode’ buried in the menus that increases focusing speed slightly, but it appears to freeze the live view in order to do so – this is a big no-no in my book because it means you have no visibility of critical action, making it very difficult to time shots. There’s also a pre-AF function that continually drives the lens while the camera is on to reduce AF times further; it works but is audible and will chew through batteries very quickly indeed; typical performance was ~200-250 images with very conservative use, and powering off the camera between images. In addition to focus peaking, Fuji have added the magnified (2.5x) digital split image simulation/ ‘rangefinder’ to the MF assist options (inherited from the X100s); it works reasonably well, but doesn’t have enough horizontal displacement to be truly effective – fortunately, that’s a simple firmware fix. Fuji claims to have a new AF-C tracking mode, which works at 3fps; it still lags behind the E-M1, let alone a DSLR.

_XE2_DSF9277b copy

Incidentally, continuous frame rate also increase from 5.6fps to 7fps, though there is of course single, locked AF only at this speed. Live view also blacks out between frames, making tracking subjects a little challenging; this would work better with the hybrid optical finder of the X-Pro. The buffer is for 37 JPEG images; RAW is of course less and will depend on your card speed. The now-obligatory wifi connectivity has been added, which allows for image transfer to smartphones and tablets via a free app; what I still don’t understand is why none of the camera makers – especially those who target these cameras at professional audiences – will make a wifi connection that allows for serious tethered shooting with raw files etc. for proper photography, not just social media. A wasted opportunity, if you ask me – especially since the hardware is already in place. Fuji are by no means the only guilty party – they can join the ranks of Olympus and Canon. I’d rather not have the feature at all if it isn’t useful.

_XE2_DSF9102b copy

Enough of specs: we’re all aware that cameras passed the point of sufficiency some time ago. Haptics and handling are far more important criteria determining whether a camera stays with you and becomes a partner or a hinderance. The X-E2 is a mix of good and bad. I admit that I am not familiar enough with the Fuji system to comment extensively on handling compared to the other models in the lineup; I’ll be approaching this from the viewpoint of a prospective new user.

_XE2_DSF9282b copy

Firstly, though the body is ostensibly magnesium, it lacks the solid feel of the X100s. The grip shape deserves praise, however: though it’s a flat and boxy camera, your fingers are guided into a comfortable shooting position that places all of the buttons and dials easily to hand. A thumb catch on the back prevents the camera from twisting out of your hand, though the AF-L and AE-L buttons are slippery, poorly located and difficult to press without your grip slipping and the weight transferring to your lens hand. Again, the shutter button needs work. The threaded release is great, but the button itself is far too notchy and seems to have three positions (there are really only two) – the feel of this one single control can make a big difference to the responsiveness of the camera, and your ability to release it without shake. The X-E2′s button is both too notchy and too firm at the break point. The large number of customisable buttons should also be commended; along with the Q button to easily access a grid of core settings, though the self timer seems oddly buried in the main menu and not part of the drive options – Fuji, people actually use this to reduce vibration for tripod work, not just self portraits. The LCD has also increased in size to 3″, up from 2.5″ for the X-E1.

_XE2_DSF9269b copy

Also deserving of praise is the ability to configure them camera before power on – at least with fixed aperture lenses – you can set aperture, shutter speed and exposure compensation from the physical dials alone, something that few cameras can match. And by using combinations of the A(uto) positions on the dials, achieve program, aperture, shutter priority and full manual modes. The dials have the right amount of tactile feel (though the lens’ aperture rings are a bit too loose and easily knocked off); I’m pleased to see there’s a big distance between A on the shutter speed dial ad the neighbouring settings to prevent accidental dislodgement. Similarly, exposure compensation now runs +/- 3EV. A hotshoe, small pop-up flash (which can be tilted backwards to bounce, providing you don’t need much light) and EVF with eye sensor complete the top plate.

_XE2_DSF9242b copy

The EVF is the 2.5-million dot OLED unit from the X100s, with 100% coverage and 23mm of eye point – very comfortable for spectacle wearers, of decent magnification (not as large as the E-M1, though I suspect it’s the same part made by Epson). I could never quite find the right setting for it – though perfectly fine indoors, it got washed out easily in daylight even at maximum brightness and lacks a dynamic/ auto setting. It does have configurable levels of information, and is of sufficiently high resolution that manual focusing is easy even without resorting to any of the focusing aids. With the continual improvement in EVFs and their ability to accurately preview colour, exposure and selectively magnify areas of the frame, the argument for a traditional viewfinder gets weaker and weaker every day; especially if it’s a dark, low-magnification one. There’s also a diopter adjustment and eye sensor to switch automatically between the LCD and viewfinder; it’s also possible to review images in the finder, something which is extremely useful in daylight and sadly lacking from either of the OM-Ds.

_XE2_DSF9176b copy

Though Fuji has significantly improved the menu system, I found it – the ‘electronic’ part of the camera – still to be my main source of my frustration. There were some aspects of control I loved, such as the Q-button and ability to change major settings directly from that screen, and the configurability of the buttons – and others that drove me absolutely mad. For example, in the aforementioned Q-menu, the command dial has the opposite effect to what you’d expect – turning left increases the value, and turning right decreases it. This seems small but is so counterintuitive that I continuously found myself fumbling. Surely there could be a custom function controlling the rotation direction of the dial? On top of that, there are multiple places to set things in the menus; sometimes it’s not clear whether the setting will ‘stick’ or not. And on top of that, other settings are buried in illogical positions – image review is under ‘Screen Set-Up’, for example.

_XE2_DSF9071b copy

Quite simply, two things need to be done: firstly, group the functions into more logical sets; secondly, remember the last used cursor position so we don’t have to hunt through eight pages of menus to find the option we were looking for. Better yet, have a ‘My Menu’ tab to allow the user to save frequently accessed options – or going one better, allow the Q menu to be configurable with any menu item. There’s one last fly in the ointment: be very careful if you’re trying to save a set of custom parameters; if you hit the wrong thing, it’ll reset all of your choices to one of the existing presets, and you’ll have to begin again. ‘Save current’ should be the default choice, not ‘apply preset’.

_XE2_DSF9039b copy

I had the opportunity to use the 18-55/2.8-4 and 60/2.4 lenses with the camera; both are optically very good, with the 60mm being excellent. The 18-55 has slightly soft corners that require stopping down a little to achieve optimal performance. It’s not much larger than competing APS-C kit lenses, but a stop faster at both ends, significantly better optically, and equipped with stabilization (of low to moderate effectiveness; I saw  some evidence of double images/ “VR bounce” at shutter speeds in the 1/60-1/100s region). On both lenses, I found the aperture rings to be too loose and accidentally moved; ideally they need a lock button to push before rotating, or stiffer detents. The same goes for the switches: the travel isn’t that much, and the detents aren’t that stiff, which makes them easy to accidentally knock out of position. That said, of all of the new mirrorless systems, Fuji has the most sensible and interesting lens lineup; it has to, since other than Zeiss, there aren’t as many options as M4/3 (which arguably is full of a lot of consumer zooms anyway). It’s also the only one with physical aperture rings, and that deserves applause.

_XE2_DSF9281b copy

You’ll have noticed my continual references to (and use of) the E-M5 and E-M1 throughout this review; Fuji have admitted that they viewed these cameras as their main competitors, and it is of course the system I’m most familiar with – and which would be my natural choice under the situations for which I’d use the X-E2. Aside from the NEX-6 and 5R, they’re also the only mirrorless cameras with PDAF on sensor, too. I’d say the OM-Ds have the advantage when it comes to lens selection; however, the Fuji sensor in the X100s is definitely a notch above the M4/3 cameras. There’s not that much to choose between them in size or price, either; though arguably the Olympus 12-40/2.8 is about the same size as the 18-55/2.8-4 and is of significantly higher spec; the X-E2 itself lacks weather sealing.

_XE2_DSF9270b copy

Bearing in mind that the camera I used was not final, I’m hoping that Fuji will do something to the firmware to address two issues: general lagginess in operation, and JPEG output. (Despite this, it was still slightly faster than the X-E1.) I’ll of course reserve judgement until I get to handle a final camera. However, my biggest concern still remains around workflow: until we have decent Adobe support for the X-Trans array, Fuji are going to be crippled in the image quality department – unless you shoot JPEG, which rather defeats the point of buying a new camera or system on the basis of image quality anyway. All in all though, the X-E2 is a solid upgrade from the X-E1 and lower spec X-mount cameras and quite possibly the best X-mount camera yet; one hopes that Fuji will fix the shutter button, and continue their track record of useful firmware updates to address some of the operational speed issues. MT

Coda: Since writing, Sony has announced the A7 and A7R full frame mirrorless cameras; I took some heat over the last two days for not being gushingly full of praise. They come at a price point that’s higher than anything else for the moment, but which will still put pressure on existing mirrorless. Nothing is perfect, not even the cameras I actually buy; that’s because you have a fixed product designed for a ‘general’ type of user, not one specific one. So: if a system works for you, great; use it, ignore what everybody else thinks, and focus on making images. If not, then keep looking. Remember, photography is about photographs, not cameras.

Thank you to Fujifilm Malaysia for providing the opportunity.

The Fujifilm X-E2 is available to preorder here from B&H.

____________

Visit the Teaching Store to up your photographic game – including workshop and Photoshop Workflow videos and the customized Email School of Photography; or go mobile with the Photography Compendium for iPad. You can also get your gear from B&H and Amazon. Prices are the same as normal, however a small portion of your purchase value is referred back to me. Thanks!

Don’t forget to like us on Facebook and join the reader Flickr group!

appstorebadge

Images and content copyright Ming Thein | mingthein.com 2012 onwards. All rights reserved


Filed under: Gearhead: Reviews

What am I using now?

$
0
0

A4517037 copy

As much as I dislike the ‘what should I buy’ type emails – just buy whatever feels good for you – I realize there’s one other question I’ve never really answered anywhere else on the site; that’s the question of what do I use for what. I did get featured on Japan Camera Hunter’s ‘what’s in your bag’ spot a little while ago; some of that is still current, some of it isn’t. In any case, I’m going to rectify that omission forthwith. These lists/ load manifests are current for the purpose as of the posting date, but I may of course vary them from time to time depending on the objectives of the shoot; they cover core equipment only. Yes, it’s a lot of stuff; do I wish I could get away with less? Absolutely. The problem though is once you’ve used the right tool for the job, and you can tell the difference in the output, it’s almost impossible to go back afterwards. Contrary to popular opinion, we pros don’t actually like to change our gear too often: it introduces uncertainties in the technical and creative processes, and when you’re on assignment, this is a risk that might make the difference between fulfilling the brief or losing a client. Before we take a new bit of gear out, it’s thoroughly tested in a non-critical environment first so we can at least get the measure of it.

_8022376 copy

On assignment – commercial work on location with artificial lighting
You might think my lens choices odd – but since we’re working stopped down most of the time, and there’s an excellent ACR correction profile available for the 24-120, it makes little sense to carry around an entire bag of primes. The zoom is versatile, sharp, and allows for fine tweaking of composition if your tripod position is fixed (which it can be under some circumstances). I’d like to add something longer to this in the future – perhaps a 70-200/4 VR – but so far have not had the need to. The wide is in there in case we’re working in tight confines, and a fast short tele is versatile for any available-light grab shots clients might ask for (happens more than you might think).

_8035918 copy

On assignment – commercial work on location with available light
Here I’ve swapped out the zoom for fast primes; there’s a 50-mm hole because I’ve pretty much never needed it. The perspective tends to be a bit boring to most of the clients I work with. If we can work at a slower pace, or if higher image quality than the D800E is required (almost never), I’ll use the Hasselblads with a CFV-39 digital back.

  • Nikon D800E and D600 bodies
  • Nikon AFS 28/1.8 G
  • Nikon AFS 85/1.8 G
  • Carl Zeiss ZF.2 2.8/21 Distagon
  • Carl Zeiss Otus 1.4/55 Distagon
  • Carl Zeiss ZF.2 2/100 Makro-Planar (sometimes)
  • One SB900 speedlight and SU800 commander for fill, though rarely used
  • Gitzo GT5562GTS tripod with Arca-Swiss C1 Cube geared head
  • A lot of spare batteries for everything
  • WhiBal neutral grey card
  • Ricoh GR on a belt holster for grab shots, documentary, B-roll, on-assignment article illustrations etc…

And/or

  • Hasselblad 501CM and 501C bodies
  • Hasselblad 4/50 CF FLE
  • Hasselblad 2.8/80 CF
  • Hasselblad 4/120 CF Makro
  • Hasselblad 4/150 CF
  • Hasselblad CFV-39 digital back
  • One or two A12 film magazines and a mix of Fuji Acros 100 and Ilford Delta 400; you never know when you might find something suited to 6×6 black and white film…
  • Spare sync cables and batteries, cable releases
  • Voigtlander VC-Meter II
  • Gitzo GT5562GTS tripod with Arca-Swiss C1 Cube geared head
  • Ricoh GR in a holster

_5009892 copy

On assignment – watch photography
This is an extremely specialised kit that I’ve developed over the years; there’s a lot of stuff in here, but inevitably I’ll use every bit of it on a shoot.

  • Nikon D800E and D600 bodies
  • Nikon AFS 60/2.8 G Micro
  • Nikon PCE 85/2.8 Micro
  • Nikon SB900 speedlights x4
  • Nikon SG-3 IR blocker panel
  • Gitzo GT5562GTS tripod with Arca-Swiss C1 Cube geared head or Gitzo GT1542T Traveller with Arca-Swiss P0 head, if flying
  • Manfrotto macro positioning rail
  • Manfrotto nano 5001 light stands and DIY diffuser panel kit
  • Plenty of clamps, clips accessories etc. for mounting speedlights
  • C-stands for mounting watches
  • A lot of spare batteries for everything
  • WhiBal neutral grey card
  • Set of backdrops and white/black card panels for light control
  • Watch cleaning kit – lint-free and microfiber cloths; blowers; the sticky goop used to clean computers
  • Ricoh GR in a holster

_8021022 copy

On assignment – food
Here I substitute the flashes with some low-temperature LED panels; they’re a lot more friendly to anything perishable, and the extra working time can often make the difference between a crisp, fresh-looking ice-cream sundae or a blob that’s beginning to melt and lose definition at the edges. It also helps the clients to visualize the shot and lighting and suggest any required changes. Reality is that we don’t really require that much resolution for food, so I quite frequently use the OM-D kit. The Hasselblad and digital back should deliver excellent results too, but in the current commercial environment where more often than not we’re shooting ordinary food straight out of the kitchen, I find myself rushing and simply having to work as fast as possible.

  • Nikon D800E and D600 bodies
  • Nikon AFS 60/2.8 G Micro
  • Nikon PCE 85/2.8 Micro
  • Zeiss ZF.2 2/28 Distagon
  • Zeiss ZF.2 2/100 Makro
  • Fotodiox 1000-bulb LED arrays, x2
  • Gitzo GT5562GTS tripod with Arca-Swiss C1 Cube geared head or Gitzo GT1542T Traveller with Arca-Swiss P0 head, if flying
  • Manfrotto light stands
  • A lot of spare batteries for everything
  • WhiBal neutral grey card
  • Ricoh GR in a holster

Or, if I’m going light

_7065846 copy

On assignment – reportage
This combination gives me fast, responsive, light and more than enough image quality for the purpose; when you’re running and gunning, there’s no way you’re going to be able to extract maximum image quality out of say a D800E anyway. Depending on what’s going on and what range the action is happening at, I’ll usually have one of the teles – typically the 45 – on the OM-D, and the GR in a holster ready to go – that way I’ve got wide and long in two bodies without a lens change, and great image quality on both.

_5022376 copy

Travel and workshops
The aim of the game here is light, small and versatile, to be able to shoot under as many different conditions as possible; all of this fits handily into either the pockets of my winter shooting jacket, with the OM-D around my neck, or everything inside a Billingham Hadley Digital. I cut a pocket into the lining of the bag to hold the iPad mini, and the two extra lenses for the OM-D are held back-to-back via two lens caps glued together.

  • Olympus OM-D E-M1
  • Leica 50/1.4 Summilux-M ASPH with M-M4/3 adaptor
  • Olympus 75/1.8 (sometimes)
  • Olympus 12-40/2.8
  • Ricoh GR and GW3 21mm converter
  • iPad mini 3G
  • Spare batteries
  • Lightweight tripod – usually the Manfrotto 345 tabletop

_8036142 copy

Personal work and film
Pick any combination of the following, depending on the day and mood:

  • Hasselblad 501C, 50, 80, 120 or 150mm lenses – never more than one or two because of the size and weight. Spare A12 magazines; usually two, one loaded with ISO 800 film, one with ISO 100. Sometimes the CFV-39 digital back, too.
  • Nikon F6 or F2 Titan with 58/1.2 Noct-Nikkor or AI 45/2.8P
  • Ricoh GR
  • Plenty of extra film – I like Fuji Neopan Acros 100 for low speed (ISO 100; good results with rich shadows at 200 and 400 with some pushing) and Delta 400 if I know I’m going to use 400 as a base; pushes well to 800. I really need to find some good ISO 1600 film, too.

If you need a full indexed list of what I currently recommend, links to reviews and where to get it, check out the Recommended Gear List here.

____________

Visit the Teaching Store to up your photographic game – including workshop and Photoshop Workflow videos and the customized Email School of Photography; or go mobile with the Photography Compendium for iPad. You can also get your gear from B&H and Amazon. Prices are the same as normal, however a small portion of your purchase value is referred back to me. Thanks!

Don’t forget to like us on Facebook and join the reader Flickr group!

appstorebadge

Images and content copyright Ming Thein | mingthein.com 2012 onwards. All rights reserved


Filed under: Gearhead: Reviews

Retro for the sake of retro: thoughts on the Nikon Df

$
0
0

Nikon-df-silv-lens

Sigh. I swore I’d never do this again after the Sony A7/A7r piece, but I’ve been getting so much email over the last few days that I have no choice. Firstly, I have no special relationship with Nikon beyond standard NPS membership. Their management here in Malaysia chooses to remain aloof. If I’m going to review one of these properly, it’s because I’ve bought it – and again, I think that’s extremely unlikely given the cost and lack of fit with my professional needs. But, here we go anyway: a highly subjective analysis of a camera that hasn’t been released yet based solely on a spec sheet and some conclusions we form from Nikon’s existing parts inventory. So, here we go: the 2013 Nikon Df.

To be honest, I really don’t quite know what to make of this camera. On one hand, I think Nikon needs to be applauded for at least attempting to provide a product that caters to the online clamouring for something that retains the sensible ergonomics of the late manual focus film era; on the other hand, I think they ought to be slapped for messing it up into a near miss. I believe this camera is going to be hugely successful. It is positioned very carefully as the anti-A7/A7r; but for the purist, it will be bypassed as a near miss.

On one hand, we have the enormous proliferation of manual controls that the enthusiast demands; from the front, I see an F3. On the other hand, it seems like there are almost too many of them: a purely manual body has no need for this many controls; at most four – focus, shutter speed, aperture, and ISO. The rest can be dealt with if you shoot raw, or are wiling to dive into a menu occasionally. And that’s pretty much how my Hasselblad CFV-39 operates. It’s about as close to the film experience as you can get with a digital body. The problem is that the Df’s back looks like any current Nikon DSLR, and that creates a bit of a schizoid paradigm here: do you shoot it like a digital body, or a film one?

My theory is that the answer to this will boil down to the viewfinder. That might seem odd, but speak to any serious photographer nowadays, and you’ll find that it’s the bright, clear, snappy-focusing-screened viewfinders of yore that we all pine for; not necessarily the controls. You simply cannot use the AI lenses this camera was targeted at (retractable AI coupling pin and all) with a modern viewfinder: it’s nearly impossible to focus! We appreciate that if you’re going to add AF and digital functions, you’re going to need a way to control these. But there’s really no excuse for a crappy viewfinder – other than corporate greed and laziness. The Df has a chance to fix that: put the finder from the F6 in there, and we’ll all be happily shooting this thing like a film body. More importantly, the mirror calibration should be spot on: none of this sloppy back/front focusing misalignment crap we see in modern cameras. Put the finder from the D600 in, and it’s going to be a pseudo-retro hipster one. I have a worrying suspicion that it’s going to be the latter: it not only has AF, but a midrange AF system with 39 points. In any case, we’ll have to wait and see. (While we’re at it, let’s hope the build quality is as nice as it looks; all metal, solid controls, snappy detents, weather sealing and no cheap paint, please.)

Update: DPR reports that the focusing screen is fixed, non-replaceable, and lacks focusing aids of any sort (split prism, microprisms): so much for that, then.

I think the choice of the D4′s 16MP sensor was a smart one: it’s more than sufficient for 99.9% of users, and it offers a very wide shooting envelope. It’s a very flexible sensor with excellent image quality. I see it as meaning two things: firstly, this is probably closer in spirit to the D700′s replacement than either the D600 or D800 were, and more importantly, it’s not a very demanding sensor in terms of lens resolving power. Those old lenses are going to produce great-looking results under most conditions, and it’s going to tolerate a little misfocus, camera shake and generally be less demanding of technique. In that sense, a bit like film, really.

Personally, I suspect that this camera is going to polarize: it’ll either make photography fun again, or it’s going to frustrate. Unfortunately, I think I might well fall into the latter camp. It’s a near miss for my personal needs: it still has too much digital overload, but the retro styling and control paradigm means compromised and possibly confusing ergonomics – why did they have to stick two control dials on, when there are manual shutter speed and exposure compensation rings? One would be sufficient to control aperture on G lenses. If I’m going to shoot it like a digital – i.e. double-dial paradigm – why do I need the physical knobs to set them to ‘A’ all the time? It doesn’t have enough resolution to replace my D800E for commercial work, and it doesn’t offer the in-body stabilization (which by the way, claws back a significant amount of the FX sensor advantage) and efficiency of controls as the E-M1 does.

In conclusion: much like the final form of the Df, I’m confused. On one hand, there are very sensible engineering choices – the sensor, for instance; but on the other hand, marketing said that you have to have AF and a full digital set of controls and a retro look, so we land up having too many buttons and knobs and a bit of an F3-collided-with-a-D600 appearance to it. The more I think about it, the more I really, really don’t know quite what to make of the Df. I’m going to wait until I have the chance to shoot with one before saying any more. But again, like the A7/A7r: even if the first effort isn’t quite right, and it takes several iterations, everybody benefits from products like this. In the meantime, I think I need a panadol for the headache that’s developing. MT

Coda: a note on price. The Df is a rather steep $2,750 – that’s quite a premium to pay for retro. Build quality remains a bit of an unknown, but it’s very nearly the same price as a D800E. Better image quality? I highly doubt it. That said, Leica have been doing the same at an even greater premium and selling them by the boatload, so perhaps they’re on to something…

If you must have retro, then the Nikon Df is available here to pre-order from B&H and Amazon.

____________

Visit the Teaching Store to up your photographic game – including workshop and Photoshop Workflow videos and the customized Email School of Photography; or go mobile with the Photography Compendium for iPad. You can also get your gear from B&H and Amazon. Prices are the same as normal, however a small portion of your purchase value is referred back to me. Thanks!

Don’t forget to like us on Facebook and join the reader Flickr group!

appstorebadge

Images and content copyright Ming Thein | mingthein.com 2012 onwards. All rights reserved


Filed under: Gearhead: Reviews

My love-hate relationship with gear

$
0
0

A0000007 copy
The guilt (and equipment) stacks up like tetris: this is only one of my equipment cabinets; if I don’t put everything in just so, then it won’t fit. And lighting gear, accessories, tripods, bags etc. are stored elsewhere.

Any photographer who tells you that they are a hundred percent, completely indifferent to equipment is lying. It is almost (I say almost to cover myself in the unlikely event there really is somebody out there) impossible to be immune to the lull of new cameras, lenses or accessories; we’ve all felt the pull at one time or another, no matter how weak or irrational. Actually, it’s the irrational that I’m going to talk about today – purchases that are necessary from a professional standpoint (e.g. you have to buy lights if you’re going to be a studio product photographer) don’t really require justification; at least insofar as there are degrees.

These degrees keep getting wider and wider, I suppose. Before you know it, you need to buy another drybox just to keep all of your extra gear; and then suddenly, from having a couple of bodies and a handful of lenses (say, immediately before I decided being professional was adequate justification) to what has now become three core systems, seven system bodies, twenty-seven interchangeable lenses, six fixed-lens cameras and countless accessories. And that doesn’t include any of the stuff I have on loan to review, which is usually a couple of bodies and lenses. I know. I keep preaching the virtues of being equipment-agnostic, but the reality is really somewhat hypocritical.

Or is it? Yes and no, I think. Being able to create the images you see independently of the gear you use frees you up to use…whatever you want. I know that I am not the limitation; you compose for a 75-degree angle of view with the same fundamental principles of light, perspective etc. regardless of the format or the box holding the medium; sure, some media may render differently from others, but one could argue that as a creative choice, too. When you have choice, freedom and business-related tax-deductibility rolled into one, why would anybody consciously choose to use something substandard? I am a strong advocate of using what you enjoy above what delivers technically the ‘best’ results, though. This is simply because something that gives you pleasure is far likely to be used more often, which in itself should result in more practice, experimentation and the improvements associated with it. (I go into a lot more detail on why the tactile pleasure and ergonomics of using a camera matters in this article.)

At this current point of technological sufficiency, one’s photographic choices are wider than ever. The notion that pros must use certain types of equipment is utter nonsense; it doesn’t affect the composition of the final image at all, and for the vast majority of applications, makes very little difference to the output quality. The myth is perpetuated as much by pros themselves as clients to keep barriers to entry as high as possible; even then, things are falling. Reality is today’s high-end compacts – the RX100/RX100M2 for example – deliver much better image quality than the top end DSLRs of just a few years ago. It’s forced manufacturers to start filling ever-shrinking niches – just look at the recent Df – to keep themselves in business.

But that doesn’t stop us from buying them. Do I, or most of my clients, need the resolution of the D800E? No; let alone the CFV-39. Do I use it because of aesthetic value in some cases – or with the Hasselblads, all cases – yes. Could I get 95% or more of the way there – even by my standards – using just one system and a little bit more postprocessing (tonal work, dodging and burning, stitching) – absolutely. ‘Need’ doesn’t really enter into this anywhere; it’s pure want want want. I don’t use any of my film cameras enough to justify having them; the F2 Titan makes me feel positively guilty sometimes because I just don’t have the time to use it. And if I did, I’d probably not really be doing it justice. But I tell you what, it certainly pushes all of the right acquisitory buttons, and I admit, there’s some odd elitist snob factor to opening your drybox and seeing it parked there (especially with a Noct-Nikkor on the front).

And here comes the hate: it just seems wasteful. I don’t know if there’s anything inherently wrong in that, since I suppose my drybox is just as good as the next guy’s, and if push comes to shove, I can still make decent images with it. But I suppose there is a substantial part of me that feels quite guilty for having handed over a significant chunk of cash to own this stuff; moreso because I’ve got so much of it that I don’t feel like I’m getting value out of it. And it’s not like I couldn’t use the money for something else, either. Usually when this feeling takes hold, you’ll see me put up a post about a garage sale – which assuages things until the next time. Most of the time though, I somehow manage to put all of this out of my mind and continue acquiring on the flimsiest of pretences.

I suppose there’s a distinction to be made between photographers and camera collectors; the former use their gear, the latter just like to have the objects. (And let’s not even get started on the fanboys; that’s a separate discussion I don’t want to go into. Unfortunately, photography is such a technical discipline that it’s very difficult to separate gear from art; they’re interdependent.) I’m fortunate enough to know several people with extraordinary collections; there are cameras which are so legendary you’d be lucky to see just one in your lifetime; they have two. Mint, in box, of course. I can’t blame them; there’s both tactile and aesthetic pleasure in appreciating rare, well-designed and well-made objects. (I can’t blame them, I’d certainly own a couple of F2 Titans – and the uber-rare unpainted version – if I could afford it.) Perhaps it’s all the more enhanced for us as photographers since I believe we have above-average appreciation of aesthetics anyway. Perhaps what I’m really having trouble reconciling internally is that over the last year, despite ostensibly focusing increasingly more on the productive side of photography, I’ve actually bought a hell of a lot of unnecessary equipment. I’m sure there are creative development benefits that have resulted – my foray into medium format film with the Hasselblads, for example – but one could also argue that I could have reached that point if I’d just forced myself to shoot square with a 50mm on the D800E. Compositionally, the result should be much the same, and I should be able to get pretty close (but admittedly, still not matching) the tonal result in postprocessing, too.

I’ll come to the point of the article now: is there really any more justification today than want? I keep thinking of fanatically religious reactions – both ways – that I get after posting thoughts on new cameras like the A7 and Df; none of them come from photographers. And that’s the disconnect that’s happening in the industry now: camera makers want to sell cameras, they don’t give two tiny mouse droppings about who buys them. Photographers want to make images. It seems that often these two things are at odds with each other.

Perhaps all of this is a consequence of the nature of today’s society: instant gratification and constant stimulation is required to keep us from getting bored. There’s no point in buying an old model simply because there’s a new one; I don’t want to wait til tomorrow, I’ll drive to the other side of town to buy it so I can have it today. And why hasn’t Ming posted his review yet, the embargo has been lifted for two hours already! Of late though, I find myself enjoying two somewhat strange aspects of the collecting process (note how I admitted to ‘collecting’) – the search, and knowing that I have the ability to buy or not buy, as I please. The latter is sometimes enough to overcome the desire to own in itself; for me there’s no pleasure in ownership, just responsibility (proper storage, proper use, servicing, etc.) – the pleasure is in the experience and the creation. Using the equipment to make photographs. And I think that’s justification enough for the rest of it- remember that before you pull out the credit card.. MT

____________

Visit the Teaching Store to up your photographic game – including workshop and Photoshop Workflow videos and the customized Email School of Photography; or go mobile with the Photography Compendium for iPad. You can also get your gear from B&H and Amazon. Prices are the same as normal, however a small portion of your purchase value is referred back to me. Thanks!

Don’t forget to like us on Facebook and join the reader Flickr group!

appstorebadge

Images and content copyright Ming Thein | mingthein.com 2012 onwards. All rights reserved


Filed under: Articles, Gearhead: Reviews

Xmas 2013 picks

$
0
0

_7000541 copy

Here’s one to get you into the spirit of Christmas: either treat yourself, treat a very good friend, or better yet, get somebody to treat you*. This list is mostly composed of new releases for 2013, or new items I’ve discovered during the course of the year. For a complete list of recommendations, see this page. Please note, all links from this page do award me a small referral commission; it doesn’t increase your price, but it does help to pay for all the bandwidth this site uses – thanks for your support!

*Here’s hoping the wife reads one of my articles for a change!

Under $100

Sandisk Extreme memory cards (from $19; Amazon | B&H) – You can never have enough storage. And a fast card can make the difference between your camera feeling snappy and frustrating. I never buy the fastest cards; you’re often paying a significant premium for speed you can’t always use.

Any one of Nick Brandt’s books ($49-90; Amazon) – See my review of his first book here. Gorgeous images of strong subjects presented in an impeccable manner; anybody who loves photography should have at least one. Final book in the trilogy now available, too – Across This Ravaged Land.

Wacom Intuos 6×4″ tablet ($79, or $99 with touch; Amazon | B&H) – I’ve come to the conclusion this is perhaps the most useful tablet you can buy; it’s cheap and gives you pretty much everything its bigger brother does. Pen feel is excellent, you can make it wireless if you wish, and it’s very small, making it handy for travel. There’s even a loop so you don’t lose your pen. If you’ve been unsure about using a tablet for editing – especially dodging and burning – this is the one to get your feet wet with, and possibly the only tablet you’ll ever need.

Fuji Acros 100 film (About $6 a roll; review; Amazon | B&H) – Perhaps the best B&W film ever made; a modern, low-grain emulsion that has incredible resolution and dynamic range; rich shadows and highlights that go on forever. It’s also very easy to handle, difficult to scratch, and develops well in a variety of solutions. Minimal to no base dye layer for easy scanning/ copying and printing. Pushes well up to ISO 800; my serendipitous discovery of the year; now my favourite film and pretty much all I shoot.

Any one of my teaching videosThe perfect way to up your game and have the opportunity to attend a workshop without having to fly anywhere! We cover photoshop at various levels; the fundamentals of photography; the compact camera masterclass, how to see, and of course the outstanding images workshop series.

Under $500

WD Passport Ultra 2TB portable USB 3.0 drives ($130, Amazon | B&H) – Fast, capacious, and perfect for backups in the field and while travelling. I’ve got a whole bunch of these and simply don’t think if I run out of storage; just go get another one.

Billingham Hadley Digital (around $200; Amazon | B&H) – My new travel bag; big enough to fit a Hasselblad, film and GR, but small enough to a) keep things light, and b) ensure you actually think about what you bring so you don’t accidentally pack the kitchen sink. Very well made, doesn’t scream ‘camera bag’ – and also waterproof.

Olympus E-PM1 Pen Mini ($229, possibly less if you get lucky. Review | Amazon) – This camera is the bargain pick here: a very competent, large-sensor interchangeable lens camera with an excellent kit lens – for less than most compacts! Yes, it’s a generation old, but at this price – you really can’t complain. And it doesn’t hold any less imaging potential than it used to.

Panasonic Lumix LX7 (From $299 up, depending on where the wind blows; review | Amazon | B&H) - Getting a bit older now, but still an excellent compact with a standout lens and image stabilization system, and with the option to add an EVF. Not that many solutions are this versatile – or this affordable. A handy thing to have in a bag or pocket at all times.

Voigtlander VC-Meter II ($225; Amazon | B&H) – A rather neat little gadget for anybody who still shoots film: sits in the hotshoe and serves as an averaging meter. I keep one in my pocket most of the time to check exposure; all of the time when I’m shooting with the Hasselblad. Beautifully made, very easy to use, and accurate, too.

Apple iPad Mini (from $335; Amazon | B&H) – This thing has become a permanent fixture in my travel bag; even when I’m out teaching in the field. I can show examples, present my portfolio, check my email, read a book, and not get lost. It’s thin, light, and the battery goes forever. Finally, an iPad size that makes sense – no point carrying a full size one around, I’d rather have a MacBook Air.

A Sandisk Extreme SSD (From $120; Amazon | B&H) – Perhaps the easiest way to give your computer a kick up the backside; moving your programs and OS onto an SSD will certainly liven things up. Makes an enormous difference when it comes to postprocessing as your primary drive can effectively act as extra RAM; if you’re completely insane, replace all of your storage with these, too. I have dual 480GB versions of this drive occupying the two bays inside my Mac Mini and used for both storage and OS; the machine is positively instantaneous. A perfect way to spend more time in the field shooting (or with your family), and less time in front of the PC!

$500-$1000

Ricoh GR ($799; Review | Amazon | B&H) – Perhaps the best compact of 2013, and certainly one of the most difficult to get hold of! Packing an APS-C sensor inside a body not much larger than its 1/1.7″-sensored predecessors, the GR’s image quality plays in a much, much higher league. It’ll give DSLRs a run for their money because of the outstanding lens; corner performance even wide open at f2.8 is astounding. Controls are infinitely configurable, and the DNG files make for excellent B&W conversions. I don’t leave home without it.

Apple Mac Mini – (From $599; Amazon | B&H) – Many of you will be surprised to discover that a slightly pimped up version of this is my workhorse – with 16GB of RAM and dual SSDs, it positively flies. It’s the most easily upgradeable Mac model this side of the Mac Pro, and far more cost effective. For most things, not much slower, either. Highly recommended.

A used Hasselblad V series – Not so easy to find, not so easy to use, but once you see the negatives…you’ll be hooked. Photographing with one is both a unique experience and an interesting way to instantly force yourself to change the way you see and work; it might well be for the better. Also a beautifully made object in its own right. Perhaps the most reliable place to start is KEH, or if you want a rarer or more minty model, then look for Bellamy Hunt at Japan Camera Hunter.

$1000 and up

Apple MacBook Air (From $948 – Amazon | B&H) – Nearly the perfect travel computer. The 11″ model is great if you’ve got a desktop primary – the screen is a bit small for prolonged photoshop; the 13″ will cover all needs. Both will now run for a whole day on one battery, and have more than enough horsepower even to handle D800E and medium format files – I know, because I’m doing it. RAM and SSD upgrades highly recommended, too; you can’t out these in afterwards.

Apple Mac Pro (from $2999, available soon) – Speed, speed speed. And a design like a nuclear warhead. What’s not to like, apart from the price?

Olympus OM-D E-M1 ($1,399 – review | Amazon | B&H) – Best of the compact system cameras; incredibly tough build, PDAF on-sensor, very responsive, great ergonomics. Takes the already excellent E-M5 and makes it even better still. Quite possibly more camera than 99% of the population will ever need. I bought two.

Olympus ZD 12-40/2.8 PRO ($999 – review | Amazon | B&H) – Perfect travel pairing for the E-M1; excellent optics, weather-sealed to the same degree, and with a very impressive 20cm near focus distance at all focal lengths – more importantly, there’s no degradation in image quality whatsoever. Also has a handy sliding manual focus ring with hard stops at both ends – a rarity in the mirrorless world, and very useful for pulling focus for video.

Nikon D800E ($2,999 – Amazon | B&H) – My workhorse. I admit I’m slowly coming around to love this one; it’s not an irrational sort of love, but how can the files make you feel any other way? Without question, the highest image quality you can get without going medium format – and even then, it gives a lot of those cameras a run for their money, too.

Zeiss Otus 1.4/55 Distagon, in Canon EOS and Nikon F mounts ($3999 – B&H) – Perhaps the ultimate normal lens: from all of the samples I’ve seen, absolutely incredible cross-frame performance wide open and at any aperture; Zeiss decided traditional double-Gauss-derived planar designs weren’t good enough for the likes of the D800E, so they used a Distagon derivative with an image circle large enough for medium format. Can you say ‘no compromises’? This is probably the only lens I’ve ever ordered without using it first, based on full size samples and reputation/ track record alone. That should say quite a lot, I think…

Profoto B1 wireless TTL monolight with built in battery ($1,999 each – B&H) - I demoed these recently and found them to basically be speedlights on steroids – 500W/S steroids, to be precise. Very, very impressive, and offering multi-system remote control from the radio trigger that goes on the hotshoe. I’m waiting for the Nikon version – it’ll be available early 2014; the remote’s TTL pins are camera-specific, of course.

You’ll notice there were no DSLR entries in this year’s list other than the D800E; I’m just not very excited by any of the new releases; they’ve frankly been just a little bit more of the same, or near franken-misses like the Df. It’s disappointing that the manufacturers don’t have much imagination, but perhaps that’s more of a business decision than anything else. When the gravy train stops, hopefully we will start to see a bit more innovation. In any case, hopefully one (or more) of these will materialize under your tree in a few weeks! MT

____________

Visit our Teaching Store to up your photographic game – including Photoshop Workflow DVDs and customized Email School of Photography; or go mobile with the Photography Compendium for iPad. You can also get your gear from B&H and Amazon. Prices are the same as normal, however a small portion of your purchase value is referred back to me. Thanks!

Don’t forget to like us on Facebook and join the reader Flickr group!

appstorebadge

Images and content copyright Ming Thein | mingthein.com 2012 onwards. All rights reserved


Filed under: Gearhead: Reviews
Viewing all 188 articles
Browse latest View live